Tag Archives: Foam insulation

Is Cor-a-vent a Right Product for Me?

Is Cor-a-vent a Right Product for Me?

Reader (and Hansen Pole Buildings’ D-I-Yer) LEE in IDAHO FALLS writes:

“Would this product https://www.cor-a-vent.com/purlin-vent.cfm be suitable for providing eave vents where no overhangs were designed. This product would be installed by recessing the eave strut (purlin) 1″ below the roof line and filling the gap with this product to provide air intake flow. Seems a better option than gable vents to get the best airflow.  It has a crush resistance of 7600# PSF.

Thanks”


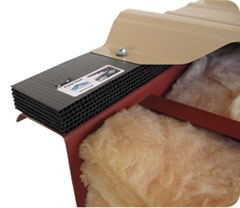
For those who did not click on Lee’s link, here is some information from Cor-a-vent’s website:

Is your insulation a wet blanket? Chances are it is. You know the problems all too well—cold side condensation on your metal roof and siding. You probably can’t see it, but it could be robbing you blind. Even slight amounts of moisture in blanket insulation can seriously reduce its R-value. Don’t count on vapor barriers—every seam and penetration has to be sealed perfectly, and how often does that happen on the job? Moisture vapor penetrates just about everything, and once it’s trapped, you have problems. The heating bill goes up, insulation can sag and the roof fasteners and purlins will start to rust. What do you do? Next building, you specify Purlin Vent™, from Cor-A-Vent—“The Leader In Innovative Rooftop Ventilation” ®

Purlin Vent is the first real system solution for venting behind roofing and siding in metal buildings. Made from sheets of crush proof profile extruded PP* Purlin Vent serves as an excellent thermal break between the metal roof and the purlin when foam insulation is used. For blanket insulation, Purlin Vent with Insulation Shield does two things. One, it keeps the blanket insulation away from the underside of the roof. Two, it creates a passageway for moisture to diffuse harmlessly to the outside.  When used with any of Cor-A-Vent’s metal roof ridge vent applications, it creates a very effective system for removing moisture and keeping your insulation dry.”

Mike the Pole Barn Guru’s take:

While your best possible attic ventilation system would be air intake at eave and exhaust at ridge, this product is probably not your solution.

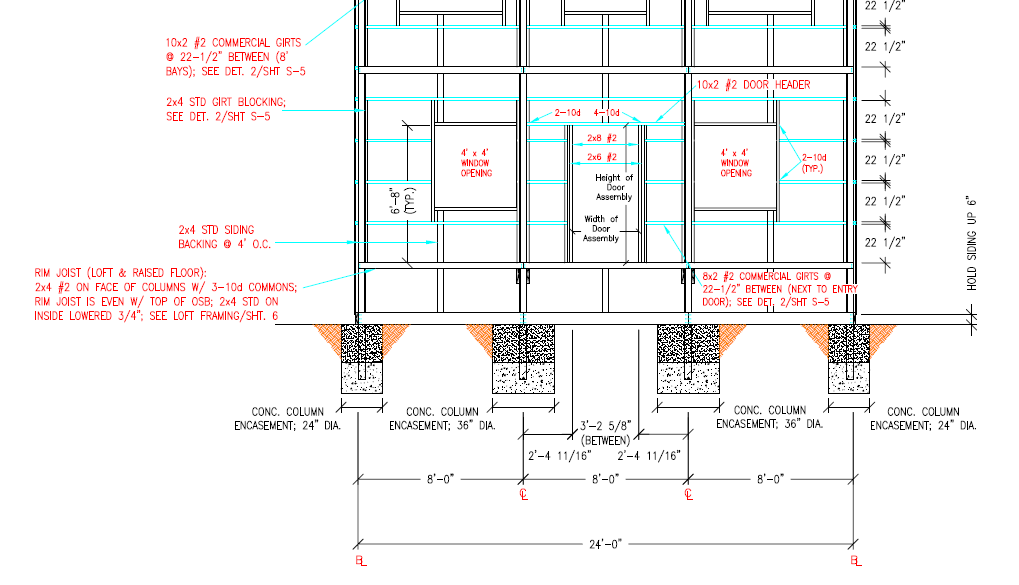
Post frame buildings work due to shear strength of properly fastened skin – in your case steel roofing and siding. In roofs, greatest shear loads are at eave and ridge – this is why you see diaphragm screws on each side of every high rib in these locations. Cor-a-vent is designed for use in PEMB (Pre-engineered Metal Buildings aka ‘Red Iron’) where rigid steel frames are carrying wind loads from roof to ground. PEMBs do not rely upon a stressed skin for their structural integrity.

If this product was to be used on top of your eave strut, screw shanks would be able to work back and forth under wind loads, in Cor-a-vents thickness. Over time you could expect to develop leaks at your eave line due to screw slotting and, under critical loads, it could be possible for this connection to become overloaded.

Gable vents are realistically your option given your building has no eave overhangs to place vented soffit in.

Pole Barn Cabin Part II

Today’s blog is a continuation from yesterday….Rick Carr, Senior Building Designer for Hansen Buildings shares his thoughts on planning his new pole barn cabin.

From JA Hansen, co-owner of Hansen Buildings….Thanks Rick!

Next I dealt with the crawl space:

After deciding that I want to do a crawl space, several design issues arise and decisions on how you will deal with those issues can affect how the building is designed and ordered.  All reading on crawl spaces emphasize making sure that you avoid moisture issues in the crawl space.  Next you need to do something to avoid losing heat to the ground and out the sides of the crawl space, this crawl space being above grade.   How tall do you make the crawl space?  Do you “condition” the crawl space?  How do you insulate it if you do “condition” the space?  Most crawl spaces are underground with a foundation wall, but that is not the case with post frame buildings so there is very little information out there on how to plan the post frame crawl space  and to “do it right”.  I have read the five blogs articles on crawl spaces, but there are still unanswered issues.

https://www.hansenpolebuildings.com/2013/03/crawl-space/

https://www.hansenpolebuildings.com/2016/04/foundation-and-crawl-spaces/

https://www.hansenpolebuildings.com/2018/06/conditioned-post-frame-crawl-space/

https://www.hansenpolebuildings.com/2018/02/insulating-post-frame-home-crawl-space/

https://www.hansenpolebuildings.com/2016/12/cost-savings-crawlspace-vs-slab/

I will present what I think that I want to do and I’d like to get Mike the Pole Barn Guru’s ideas on it with a question or two.

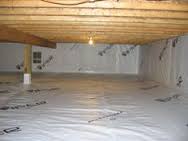
I plan to condition the space, so I would put down between 6 and 10 mil plastic, then 2 inches of foam board insulation followed by pouring a concrete floor, just enough to keep critters out.  I plan to use BIBS insulation in the walls, so I would extend that down the exterior crawlspace walls to the concrete.
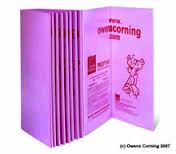
 

The radiant floor heating people that I am talking to have recommended that I put between R-13 and R-15 insulation on the underside of the sub-floor.  The reasoning is that heat wants to move to cold and that you don’t need the crawl space heated to the same temperature as the living space; so insulating the underside of the floor keeps most of the heat up in the living space.  I need to talk to the insulation contractor about what type of insulation to use here.  Spray foam might be good, but the spray foam would make working on any plumbing or electric that is run below the floor very difficult, partially defeating one of the purposes of having the crawl space.

The plastic with the concrete over the top should control the moisture issues coming up from the ground.  The 2 inches of foam insulation under the concrete should help to prevent losing heat to the ground. The concrete should keep critters out and allow using a “creeper” to move around down there.  I haven’t decided on the height, but I’m thinking that it should be three feet.  When on all fours, I am almost three feet tall.  I am 6’3” and it has to be functional.  I would need assistance to figure out how high to make the top of the floor to yield the three feet considering the concrete and foam.

I have not yet discussed this plan with the building inspector.

So Mike, the questions; do you think that this is a good plan?   Would I be able to put in the 2 inches of foam board and the 2- 2 ½ inches of concrete (normal concrete floor being 3 ½ inches) without doing anything different to the splash boards considering that the splashboards are 2×8’s and that there will not be any door thresholds to be worried about?

Stay tuned for Mike the Pole Barn Guru’s answers in an upcoming blog.

Insulating a Semi-Trailer Truck

Insulating a Semi Trailer

The beauty of being available to answer questions on the ‘net is one hears just about everything – even challenges which do not involve buildings!

Here is a recent one asked by reader BOB in NORTH CAROLINA:

“PolebarnGuru,
Purchased a 53foot x 8.5ft dry van all metal trailer (like tractor trailer) want to frame inside ceiling w 2 x 3’s. Have 2″ Rigid foam insulation, 4 x 8 sheets. Haven’t installed anything yet bc we want to do it right. Do have condensation in mornings. Live in nc very hot in summer, and this winter very cold. Plan on putting Windows in maybe two turbines on roof if necessary. What is correct way to install rigid foam insulation? On walls and ceilings. Some tell me to glue plastic sheeting on inside metal walls and ceiling and leave a 1 inch space between that and rigid foam.

Thanks in advance”

No idea what the end goal is of your project, however it sounds like a lot of work to try to climate control a very long narrow space.

Hopefully the insulation boards you have are closed cell foam, which will give you an R-5 or so per inch of thickness. I would do away with the 2x3s and glue three thicknesses of insulation to the ceiling and two thicknesses to the walls. If your insulation has a facing, tape seal all of the joints, if not, cover with six mill clear visqueen sealing any tears or seams. Foam insulation board is highly flammable, so then glue 5/8″ Type X gypsum wallboard to the inside and at the least fire tape all of the joints.

This should at least provide an R-30 ceiling and R-20 walls and eliminates the transfer of heat and cold through the studs (wood is R-1 per inch). You do not have a dead attic space to ventilate, however you may need to provide a powered exhaust fan in order to keep it cooler in the summer.

Insulation Between Roof Purlins

From the number of “Ask the Pole Barn Guru Questions” I receive and the new pole buildings I see being constructed, climate control is of very high importance. When I first entered the post frame industry 35 years ago, no one cared about it as virtually all ‘pole barns’ were farm buildings or small private garages. Not the case anymore! Pole Buildings run the gamut from heated shops, airplane hangers with living spaces and custom designed homes or year around lake cabins.

For heating and cooling, it is most efficient to have to control the least amount of space. Reducing the height of the area to be heated, will result in more comfortable temperatures in the area humans typically occupy.

Installing a ceiling
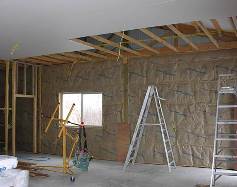
This area can be reduced by finishing off the ceiling (with my personal preference being gypsum wallboard) and blowing in insulation above the ceiling – along with having a properly ventilated attic space. To give a rough idea of the volume of space differentials on a 40 foot wide by 60 foot long by 12 eave height building, having the most typical roof slope (4/12), about 25,000 finished cubic foot of area is to be conditioned with the ceiling, as opposed to nearly 34,000 cubic feet otherwise.

A significant amount of some sort of fuel is going to be used to heat or cool the extra one-third volume of space!

Some people prefer to insulate between the building roof purlins, however this can be fraught with potential challenges if not done properly.

The easiest solution, however possibly not most cost effective, is to utilize spray foam insulation. For most people, this is just not an affordable solution (read more at: https://www.hansenpolebuildings.com/2014/02/insulation-foam-fiberglass/).

Unfaced (typically fiberglass) insulation can be placed between the purlins. The purlin dimensions can be increased to allow for thicker insulation – which will be required (in most cases) if energy code requirements need to be met. By Code, airflow must be provided above this type of insulation. As roof purlins run the longitudinal direction of the building, 2×4 material can be placed flat on top of the purlins, running from eave to ridge. In order to utilize the space created by these 2x4s, the eaves and ridge will need to be ventilated.

A vapor barrier will need to be installed above the air flow area, if the roof is through screwed steel over purlins. An ideal solution would be a reflective radiant barrier, with another flatwise layer of 2x4s placed on top of it (in the same direction as the roof purlins). This creates another dead air space which improves the efficiency of the reflective radiant barrier.

Seriously looking to insulate between roof purlins while conserving energy? Design it right in the beginning!

Pole Building Insulation Once Constructed

Welcome to Ask the Pole Barn Guru – where you can ask questions about building topics, with answers posted on Mondays.  With many questions to answer, please be patient to watch for yours to come up on a future Monday segment.  If you want a quick answer, please be sure to answer with a “reply-able” email address.

Email all questions to: PoleBarnGuru@HansenPoleBuildings.com

DEAR POLE BARN GURU: I want to insulate my already constructed pole building that has 10′ center uprights 8.6 in between uprights 16′ sheathed ceiling’s uprights are 5.5″ diameter what’s the best most cost effective way to go about it. MARK IN CAMBRIDGE

DEAR MARK: I’m going to have to do some guessing as the math doesn’t quite work out. If your “uprights” are on ten foot centers then the space between the columns will be 9’6”. If the space between is 8’6” then your columns are nine foot on center.

Ceiling will be easy – as long as you have a thermal break (e.g. reflective radiant barrier or similar) insulation can be blown directly on top of the ceiling. If no thermal break has been provided, then a layer of spray foam insulation should be applied to the underside of the roof steel.

Adequate attic ventilation will need to be provided – read more about it here: https://www.hansenpolebuildings.com/2014/02/pole-building-ventilation/

For the walls, the first step – remove the wall steel, one wall at a time. Install a good quality building wrap (https://www.hansenpolebuildings.com/2012/11/house-wrap/).

How the inside is handled will be based upon the materials being used on the inside of the wall. For materials which will not crack (steel liner panels, OSB, or plywood) 2×4 wall girts can be added to the inside of the columns “barn style”.

For sheetrock, things get a little more dicey, as the original design of the building should be checked by a RDP (Registered Design Professional – engineer or architect) to verify the building is stiff enough to keep deflection within allowable limits. Provided the building is adequately stiff, 2×4 or 2×6 wall girts can be added “bookshelf” style (https://www.hansenpolebuildings.com/2011/09/commercial-girts-what-are-they/).

Once any electrical work has been completed in the walls, unfaced batt or BIBs (https://www.hansenpolebuildings.com/2011/11/bibs/) can be added to the wall assembly. A well-sealed vapor barrier needs to be placed on the inside of the wall insulation https://www.hansenpolebuildings.com/2013/07/moisture-barrier/.

DEAR POLE BARN GURU: Have you ever tried using stands under your posts before you pour. I like the concept brand “X” uses, just seems a little overly complicated.

Thanks. SCOTT IN MACOMB 

DEAR SCOTT: Without knowing who Brand “X” is, hard for me to comment on their methodology. I have not personally tried the use of stands, however I have written about them: https://www.hansenpolebuildings.com/blog/2014/05/one-pour-reinforcement-cage/.

This does seem like a costly method, when it is actually quite simple to just ‘float’ the posts in the holes: https://www.hansenpolebuildings.com/blog/2015/04/floating-poles/

Mike the Pole Barn Guru

DEAR POLE BARN GURU: Can a pole barn be designed for a crawl space instead of a concrete slab? SUSAN IN OPELIKA

DEAR SUSAN: Most certainly. As we are seeing more and more people gravitating to pole barn (post frame) technology for dwellings, we are designing more homes over both crawl spaces and full basements. We design pole buildings for folks with crawl spaces quite frequently. You can read more about pole barn crawl spaces at: https://www.hansenpolebuildings.com/2013/03/crawl-space/. Or, if a crawl space isn’t enough, a basement: https://www.hansenpolebuildings.com/2013/04/basement/.

Mike the Pole Barn Guru

DEAR POLE BARN GURU: I have been planning a 24 x 48 x 10 three sided barn as it fits my needs for equipment storage and heat build-up and natural light. I read your blog on 3 sided barn vs. wind. My barn would be enclosed on the long north wall and the short east and west if I left open the east wall would that be enough to alleviate the wind pressure concern.
Thanks. BUDD IN MARIANNA

DEAR BUDD: From reading my article on three sided buildings (https://www.hansenpolebuildings.com/blog/2014/03/three-sided-building/), you have found out it may not be the most economical design solution.

Ideally, you would be able to construct a four sided building. The three sided design works fine structurally, as long as it is properly designed to resist the added loads. If you leave a long side and a portion of one of the other walls open, then you could reduce the wind pressures. In any case, I would recommend you seek out the services of a firm such as Hansen Pole Buildings – who can arrive at a solution which is structurally sound and best meets your needs.

Mike the Pole Barn Guru

Which Insulation to Use?

Welcome to Ask the Pole Barn Guru – where you can ask questions about building topics, with answers posted on Mondays.  With many questions to answer, please be patient to watch for yours to come up on a future Monday segment.  If you want a quick answer, please be sure to answer with a “reply-able” email address.

Email all questions to: PoleBarnGuru@HansenPoleBuildings.com

DEAR POLE BARN GURU: We live in Texas. Can we use your configuration tool and have ya’ll create a plan for us? We will be building the barn ourselves.

If so, how much would the plan be for a 24 by 40 pole barn, 12 foot side walls, 6/12 roof pitch, one garage door, one personal door and 4-6 windows?

Thanks, Dan

DEAR DAN: We’d love to help you out with your proposed project – in fact it is what we do every day! Our system is totally geared to people who want to find the most savings as well as enjoying the pride of ownership which comes with a job well done.

Mike the Pole Barn Guru

DEAR POLE BARN GURU: We are undertaking a project of insulating our indoor riding arena/pole barn. We are installing the ceiling to the bottom of the trusses (got the ok from a structural engineer). We cannot decide what would be the best type of insulation to put in top of the ceiling. The choices: 1) spray foam, too toxic, too expensive. 2) blown cellulose/paper product-worried if it gets wet through the roof vent, worried that critters nest in it, worried that it blows around (from roof vent) 3) fiber glass – carcinogenic if you breath it in, while installing mostly, degrades through the years, critters can nest in it. 4) hard sheets of Styrofoam – like that it is solid, won’t rot if wet, won’t blow around, 4 x 8 sheets fit in between the trusses, don’t know if the “R” value is high enough or if it would insulate enough. We can’t decide what would be best. The ceiling is 29 gauge metal panels, looks like roofing. Question from Cindy in Warwick, NY

DEAR CINDY: Trying to insulate an indoor riding arena will literally be an undertaking and there is a strong possibility it will prove to be an untenable task just trying to heat the huge volume of space.

Before getting too deeply into your challenges, there needs to be a thermal break between the roof framing and the roof steel. If one was not installed at time of construction, the best choice might be to have a thin layer of spray foam placed on the underside of the roofing.

The other option would be to remove the roof steel, place the reflective radiant barrier and then reinstall – which could easily be quite an undertaking.

With the condensation problems solved, ventilation is the next step to tackle. If you have vented overhangs and ridge, it is probably adequate. If not, an entire new set of issues awaits you – as gable vents will become the only Code approved method of ventilation. If water is coming through your ridge vent, then it was done incorrectly (either wrong product, or poor installation) and should be replaced or repaired.

My recommendation is going to be blown in either cellulose or fiberglass. It is going to give you the highest R value per dollar. A professional installer can blow it in, removing the risk of you inhaling. In your part of the country you should probably be looking at as high as R-60. Once installed the probability of the insulation blowing around in your attic is small and even a nominal amount of settling can be handled by adequate thicknesses to begin with.

As far as degradation of blown insulation – we are talking about decades, not months or years. If you do blow in insulation and have vented eaves, be sure to place insulation baffles (cut from high R foam board) appropriately to keep insulation from falling into the overhangs. The baffles also allow an inch of clear net airflow over the top.

Mike the Pole Barn Guru

DEAR POLE BARN GURU: I want to submit two requests for quotes – one for a larger building and one for a smaller building – because I don’t yet know if the house I will decide to buy and renovate will have an attached garage or not.  If it does have an attached garage, then I would go with the smaller building.  If the house does not have an attached garage, then I will want to go with the larger building.  Both buildings would need a back overhead door for driving our trailered boat in through the back and out the front.   Both buildings would need one taller and wider opening for the boat and either one or two smaller openings for cars/equipment.  Both buildings would have wainscot, single-hung windows, all metal roof and siding, no skylights, eave lighting, ridge vent, etc.

I am thinking of a residential pole gable building garage/workshop combo for my husband’s home workshop, home lawn and snow equipment, 22′ boat on trailer, shelving storage, etc.

Can I submit more than 1 request for a quote on-line or would it be better to talk with a customer rep on the phone and/or submit drawings, or wait until I find the house that I am going to renovate in order to see if it has any attached garage?

Thank you,
Double Requests

DEAR DOUBLE: Some of the answer depends upon your goals. If you need some sort of budgetary figures only, to assist with your house purchasing adventure, then requesting multiple quotes online will be a quick way to get started.

Ultimately, until you have actually purchased a property, any preliminary information is going to be just what it is – preliminary. The best dictate for what you will eventually build will be determined by the property you will be building on.

Once you have an idea – you can get more than one quote either online, or by calling the toll-free number listed on the website – one of our building designers will be happy to assist you in your planning.

A caution – be sure to talk with the Planning Department which has jurisdiction over any property you are considering purchasing. There may be restrictions on what you will be allowed to build and it is best to find them out prior to signing the check.

Mike the Pole Barn Guru

Dear Pole Barn Guru: Can I Use Spray Foam Insulation in My Pole Barn?

Welcome to Ask the Pole Barn Guru – where you can ask questions about building topics, with answers posted on Mondays.  With many questions to answer, please be patient to watch for yours to come up on a future Monday segment.  If you want a quick answer, please be sure to answer with a “reply-able” email address.

Email all questions to: PoleBarnGuru@HansenPoleBuildings.com

DEAR POLE BARN GURU: In northern Idaho, just east of Coeur d’Alene, I had a pole barn put up without insulation figuring I would build 2×6 walls between the posts and insulate with batts and then plywood the walls later for a work shop. Can spray foam be used instead? Could I frame 2×4 walls instead of 2×6? Can it be sprayed onto the metal siding and roof without any negative effects showing up later? I will have a heater in there, but probably not on full time. QUIRYING IN COEUR d’ALENE

DEAR QUIRYING: Can you use spray foam? The answer is yes, however it is probably the most costly choice, and the Building Code requires any spray foam to be covered with non-combustible material (e.g. gypsum wallboard).

For the walls, you could frame a non-structural 2×4 studwall, holding it flush to the inside of the columns, and place batt insulation between the studs. The studs do not have to be the same depth as the insulation, and in doing so, you will eliminate a thermal bridge.

Beware, less costly (per inch of thickness, not R value) open cell foams are permeable to moisture – so condensation could become an issue. To obtain an R-19 rating from spray foam, be prepared to spend around $3 to $4 per square foot of insulated area.

While spray foam is relatively light weight, always check with the manufacturer of the roof trusses and the Registered Design Professional (RDP – engineer or architect) who designed your building to verify the weight of the insulation being added will not compromise the structural integrity of the building.

DEAR POLE BARN GURU: I sent in three pole barns that i am looking to get a quote for. my families barn just recently burned down a few days ago due to undetermined causes. We lost our animals in the fire which was devastating. Our pigs and chickens were our livestock and our food. We need to get a barn up and built soon to get our farm running again. I have a few questions about this, first off if i go ahead and purchase this kit how does it get delivered to my house. Second, if this is purchased is the supplies all in one kit that you ship out or is it a list a what we need and i have to get it? please get back asap thank you. NEEDY IN NEW YORK

DEAR NEEDY: I am deeply sorry for your losses. Fire is so devastating.

When you order from us, the materials are delivered to you via truck.

You are purchasing from us the design, the complete 24″ x 36″ blueprints which are specific to your building and show where every board is placed. Not only to we provide all of the materials for construction, but we give you detailed instructions as to how to assemble everything.

DEAR POLE BARN GURU:  What is your standard design practice to accommodate a wider O/C truss?  Double the truss? Or increase the truss member sizes?

VASCILATING IN VERSAILLES

DEAR VASCILATING:  Our most common practice design in general is a system using doubled trusses spaced most commonly every 12′ (although spacings 10′-16′ are also very common). The doubled (or more technically “ganged”) truss system affords some safety not found in single truss systems – as multiple trusses physically connected to each other all for true load sharing. The probability of two or more connected trusses having the exact same weak point is phenomenally low – reducing the risk of a catastrophic failure in an extreme loading situation. Ganged trusses also require less bracing than single trusses, adding to ease of installation, as well as lower costs and a “cleaner” finished appearance.  It also may mean no cumbersome (and expensive) truss carriers.  Lastly, if you put overheads in a sidewall, having the double trusses mean you could put as wide a door as 12’, and have plenty of room to put in a hoist system to lift a vehicle between the sets of trusses.

Vascilating then responded:

Thanks for the quick response. I assume, then, the practice is to utilize 12′ 2×6 purlins placed on edge on top of those trusses?

Is the spacing of 12′ the same for an attic truss? I recently got a quote from Hansen for a gambrel building with which I intend to have attic trusses. Is it common practice to finish a room using the knee walls of those trusses?

Dear Vacilating:

Every client gets my individual and undivided attention for as long as they need to get their questions answered.

The snow load will dictate purlin size, but they will be 2×6 or larger, joist hung between the trusses. Attic trusses will be the same, however may be more than just a 2 ply truss depending upon the span and load. Most typically people will finish those spaces with a knee wall.

Unless you are absolutely married to the gambrel look, the most efficient and cost effective design for multi-story space, is to just design a multi-story building. For about the same cost, you can get full room height from sidewall to sidewall


Insulation: Foam It or Fiberglass It?

I enjoy Hansen Pole Buildings’ Designers who really like to sink their teeth into a subject.

This morning Rick asks me, “Have you ever done a cost comparison on spray foam roof insulation vs the costs of condensation barrier, ceiling load trusses, joists, drywall ceiling and blown in insulation?”

The entire question was brought about, as Rick really gets his clients to think about how they will be using their buildings.

In order to do a comparison, I just plucked from the air a 40’x60’ building, double trusses every 12’ with a 4/12 roof slope and 12” overhangs. Fairly common, pretty standard.

So, what needs to be done in order to spray foam a pole building?

Spray Foam Insulation
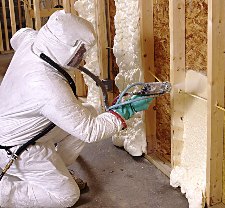
For starters, keep in mind (by Code) spray foam insulation cannot be left exposed, it has to be covered with inflammable material – like gypsum wallboard. Gypsum Wallboard is not as flexible as steel, so it has deflection criteria which mean upsizing the roof purlins from 2×6 to 2×8, or changing the column spacing to 10’ on center(o.c.). In the end, when I priced it out the change to 10’ o.c. was less costly, adding only about $900.

In either case, the truss loading will need to be increased to support the extra weight of the system – the top chord loading for spray foam or the bottom chord to create the dead attic space. Statistically – pretty much a wash in costs.

Due to the run of the roof, the spray version is going to take a little more drywall – call it $50

In the northern ½ of the United States, the recommended minimum attic insulation is R-49.

Spray foam is not inexpensive. With 2×6 purlins on edge, the maximum foam insulation thickness is 5-1/2 inches. At R-7 per inch for closed cell foam, will result in an R 38.5. The going rate for spray foam runs from $1 to $1.25 per square foot (sft), per inch of thickness – plus travel and fuel surcharges. To keep it easy, I will use $1 and ignore the rest. Including the run of the roof, roughly 2520 sft at $5.50 per sft is going to cost $13,860.

Total added costs for spray foam = $14,810

How about fiberglass in a dead attic space?

Increased truss load has previously been covered.

Ceiling framing must be added between trusses to support the wallboard – roughly $1200 including all of the Simpson hangers.

A reflective radiant barrier must be placed between the roof purlins and the roof steel, to prevent condensation, which would then rain on the insulation. $650

And the ridge must be vented. Under $200

According to Lowe’s, to get an R49 with fiberglass would require 74 bags of blow-in insulation at $32.75 a bag for just over $2400.

Total costs for fiberglass = $4450.

In summary, spray foam costs would be roughly 333% of the cost of fiberglass, to get to 78% of the R value. The other downside is with spray foam, the area of the trusses now has to be heated (almost 8000 cubic feet of space) before the area below it is going to feel warm!

Dear Guru: Does Spray Foam Insulation Need a Vapor Barrier?

Welcome to Ask the Pole Barn Guru – where you can ask questions about building topics, with answers posted on Mondays.  With many questions to answer, please be patient to watch for yours to come up on a future Monday segment.  If you want a quick answer, please be sure to answer with a “reply-able” email address.

Email all questions to: PoleBarnGuru@HansenPoleBuildings.com

DEAR POLE BARN GURU: Do you need a vapor barrier between steel and spray foam insulation? BUILDING IN BEMIDJI

 DEAR BEMIDJI: Properly installed, spray foam insulation should act as a more than adequate vapor barrier.


DEAR POLE BARN GURU: would like a ballpark figure on a pole 100 long 40 wide 1 double door 2 man doors texture 1-11 all walls. JUST JOHN

 DEAR JUST: Hansen Pole Buildings is happy to provide pole building quotes for you, or anyone for this matter in the 48 United States.  On the Hansen Pole Buildings website, is the ability to request a quote, all you need to do is provide the specifics of your building, as in where it will be constructed geographically. Click on the Free Quote button on the left of the home page – and you are there!  All buildings are priced according to your local design criteria. You can fill out as much or as little of it you want, but without your location, any price I give you will be “out of the ballpark”. Ten to fifteen minutes, and you can have an exact price!

DEAR POLE BARN GURU: When ordering directly from you, do you have references for contractors to assemble in our area?  Thanks. PONDERING IN PUEBLO

DEAR PONDERING: Just to make sure we are on the same page, Hansen Pole Buildings is not a contractor in any sense of the word. We do not construct or build buildings (or portions of buildings) anywhere for anyone. Should you need a builder, we do have a list of builders for nearly everywhere in the country.

This is not an endorsement on our part of any particular builder’s skills or lack thereof. As none of them work directly for us, we can’t guarantee the quality of their work. We do have a “one strike and you’re out” rule. Simply, if we receive even one verifiable and legitimate negative complaint about any particular builder, we will no longer give out their name to our clients. While this is not a fail-safe method, it does afford some degree of protection. It is always a good idea to speak with other customers the builder has done work for in the past, to get an idea of the builder’s professionalism. At any time a contractor can hire a crew member unbeknownst to him (or us) who will be “less than expected”.  Even “good” contractors have “bad” days, so whether you hire one of your own choosing or use one from our list, make sure you do your homework BEFORE you hire them.

Insulation: When the Fold Hits the Fan

Greg, one of my blog readers, posted a comment online in regards to using ¼” foam fanfold insulation between roof purlins and roof steel. While I have seen this used, I have never done it myself, so I felt it was due time to get on my research tennies and find out more.

Fanfold InsulationFanfold insulation is an extruded polystyrene foam insulation which is designed to be applied to the exterior walls of homes, between sheathing (or pre-existing sidings) and usually vinyl siding. Its purpose is to provide thermal protection and to form a second barrier between the elements and the framing. When used over existing sidings, it provides a flat nailing surface for quick siding installation.

Products such as Owens Corning Foamular® are typically used in traditional low slope commercial roof applications where the insulation is placed below the roof membrane.

Class A (the best) fire resistance rating is based on ASTM E108 testing of fire spread, and in the case of wood decks, penetration, on the top side of roofs. Ratings are based on complete assembly performance and depend on variables such as deck type, membrane type and the slope of the roof. Commonly extruded polystyrene insulation products have some type of cover placed over them before the roofing membrane is installed. Cover materials include board products like gypsum or high density wood fiber. Or, depending on the type of membrane, a slip sheet may be used.

Polystyrene happens to be an environmental nightmare, as it is nearly non-biodegradable and is seldom recycled. It ignites easily and when it does it releases some nasty gases. These include Benzene, a highly carcinogenic substance, and styrene which is readily absorbed through the skin, respiratory system and gastrointestinal tract. Exposure can cause deep unconsciousness and death. The vapor can damage the eyes and mucous membranes. Styrene gas releases a great deal of soot when polystyrene foam is burned. The soot is dangerous to the respiratory system when inhaled.

Out of curiosity, I looked into the cost of fanfold insulation. A major home improvement (big box) store, retails 200 sft (square foot) bundles for $33.25 before sales tax. This works out to being just under 17 cents per square foot. In the product description, it states it is perforated to allow excess moisture to escape, and lists the R value as being one.

In order to qualify as a residential vapor retarder, a product must have a water vapor perm rating of 1.0 or lower (the lower the number the stronger the vapor retarder).  Foamular® is rated at 1.1 perm, based upon a one inch thickness. The product does NOT qualify as an effective vapor retarder.

If Foamular® is relied upon to create an air and/or moisture barrier, then joints should be sealed. However, due to penetrations and other practical considerations, it is often more efficient to install air/moisture barrier layers elsewhere in the assembly rather than try to seal the joints.

My summation – fanfold foam should not be used between roof purlins and roof steel in an attempt to control condensation. Even with sealed joints, it does not have a perm rating adequate for its intended use. If used, in order to prevent a plethora of problems in the event of fire, a layer of fire resistive material such as 5/8” type X drywall should be placed over the purlins first – which creates a potential for an entirely new set of issues due to lack of shear strength of materials.

For a cost effective vapor barrier system, look to using a reflective radiant barrier which has been manufactured with a tab on one long edge which has a PSA (pull strip attached) covering an adhesive. It’s simple, cost effective, and performs well if installed per instructions.