Tag Archives: fascia board

Deep Fascia Overhangs

The definition of Fascia from the sum of all human knowledge (Wikipedia):
“Fascia (/ˈfeɪʃə/) is an architectural term for a vertical frieze or band under a roof edge, or which forms the outer surface of a cornice, visible to an observer.

Typically consisting of a wooden board, uPVC or non-corrosive sheet metal, many of the non-domestic fascias made of stone form an ornately carved or pieced together cornice in which case the term fascia is rarely used.

The word fascia derives from Latin “fascia” meaning “band, bandage, ribbon, swathe”. The term is also used, although less commonly, for other such band-like surfaces like a wide, flat trim strip around a doorway, different and separate from the wall surface.
The horizontal “fascia board” which caps the end of rafters outside a building may be used to hold the rain gutter.”

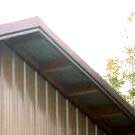
In layperson’s terms, the fascia is the outside member of an overhang which is extended past the eave side (where the rain water drips or snow slides off) off a building.

For most residential structures, the fascia board is a 2×6 or 2×8, which provides an overall fascia height approximating five to seven inches depending upon slope of roof, etc.

Open Overhangs
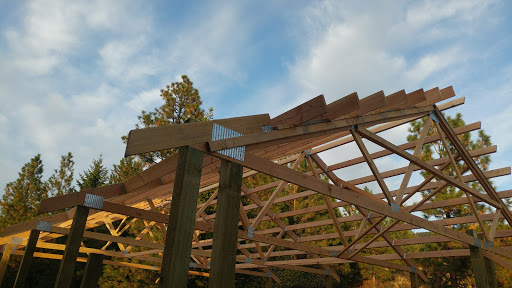
There are some cases where it is advantageous to increase the height of the fascia, these would include (but are not limited to):
Aesthetics (aka looks) – some people like the look created by a deep fascia overhang.
Supporting signage – on commercial buildings having a deep fascia on the eave side of the building several feet in height can allow for signs for a business or businesses to be placed.

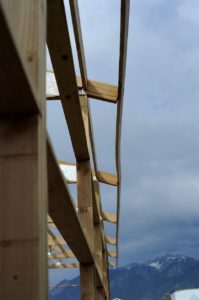
We recently ran across an instance where a client needed to have a tall door in the endwall of his new post frame (pole) building, however his Planning Department had a strict limitation upon the allowable height of building sidewalls.

Enter the thinking caps.
By the creation of a deep fascia overhang, the eave height (read more on how eave height is measured here: https://www.hansenpolebuildings.com/2012/03/eave_height/) was able to be increased by several feet, without the need for longer siding – meeting the strict requirements of the Planning Department!

Dropped Chord End Truss Framing

How to Frame a Roof Corner With a Dropped Top Chord End Truss

Josh and I are becoming better acquainted with each other. Josh happened to not have invested in a Hansen Pole Buildings’ engineered post frame kit package and as such – didn’t have a source of Technical Support which could guide him through the process (nor the Hansen Pole Buildings’ Construction Manual). Because we truly care about all buildings post frame, we help everyone – we believe in paying it forward.

JOSH writes: “I have another question for you. I have drop top gable trusses (not really sure what the name is)? What is the proper way to frame the corner overhangs since the last purlin and eave girt will not extend over the truss? I don’t want the snow to sag the corner. These trusses were built by Trusstek in Bonners Ferry. Thanks so much.”

Mike the Poe Barn Guru Responds:

I can tell by your framing you have been reading my articles and perhaps eyeballing the sample plans and details on the Hansen Pole Buildings website. I really like your having doubled the interior trusses and nailed them face-to-face, rather than placing blocking between them. By joist hanging the purlins into the double trusses, you will be able to pre-drill the roof steel. While this may sound time consuming, it truly makes for a quick roof install, all of the roof screws will be in beautiful, straight rows and you won’t have any shiners which would result in roof leaks down the road.

One thing I probably would not have recommended is using a drop top chord truss on the endwalls. Not for the framing challenge you have encountered, but because I would want the raised heels on the interior trusses to allow for full insulation depth in the attic to the outside edge of the walls. By using a raised heel, the bottom chords of all trusses can be placed at the same height, making it easy to attach ceiling joists without added framing members.

To address your question – when you install the varge rafter across the ends of the overhanging purlins, it will extend out far enough to be able to attach the fascia board to the back side of it. You will want to nail through the fascia into the overhanging “tail” of the end truss. Confirm with the engineer of record who designed your building, but I would typically recommend the use of four 10d common hot dipped galvanized nails through the fascia into the end truss tail, as well as through the varge rafter into the fascia and overhanging purlins. Using a loner nail will usually result in splitting the wood you are nailing in to and a smaller diameter reduces greatly the lateral shear value of the nails.

Let me know if you have any other questions. Hansen Buildings is here to help!


The Straight and Narrow of Fascia: Hansen Building Disaster Part III

The Straight and Narrow of Fascia:  Building Disaster Part III

Look at the board on the far right. The one which resembles the coastline of New Jersey. It is what is known as a fascia board and it is pretty important it be straight.

Why?

Because not only do vinyl soffit panels attach to the underside of it, but steel trim covers the face of it. Steel trims are very happy to be installed on straight boards.

But other worries are looming in this photo.

The roof trusses were manufactured in a plant which seemingly has some challenges with plumb cutting (which was specified on our order) Read about plumb cutting here: https://www.hansenpolebuildings.com/2015/09/trusses-9/. None-the-less the builder might have stumbled upon reading in the plans or the Hansen Pole Buildings’ Construction Manual and seen the necessity to have cut the tails plumb. He instead has opted to just nail the fascia board onto the ends of the square cut tails.

This creates more problems – such as the inability to install the soffit panels. Which, since he left the framing off the sidewall to support the soffit panels, might have been why he quit where he did.

Notice, if you will, how the outside face of the bookshelf wall girts and the wall columns are in the same plane.

They are not supposed to be. The wall girts should extend outside of the columns by 1-1/2 inches. This allows for the outside of them to be flush with things such as the skirt boards, which the builder has installed on the face of the columns! I suppose the thought was the wall steel would just curve to make up the difference?

Tomorrow, the client proposes some solutions to some of the issues and I will give my take on why those solutions may, or may not work.

Fascia Challenges

If you are like me, you looked at this photo and the first thought was – the trim on the upper roof looks…..well frankly bad.

fascia trims
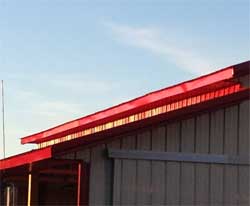
Well it is bad, and it is bad due to installation issues, which could easily have been avoided.

1. The first trick to getting a good looking fascia, is to pick straight boards. The Hansen Pole Buildings Installation Manual even encourages setting aside the straightest boards to use for fascia boards.

2. Make sure the fascia boards are installed straight (as in up and down straight), as well as in and out straight. It is all too easy for the heights of truss or rafter tails to be up or down by even fractions of an inch. Start getting one end up, next end down and repeat the process a few times (even if by only 1/8th of an inch) and things can get messy. Ideally, attach the fascia boards to the truss or rafter tails by use of a tight stringline.

3. Fascia trims are best installed when they are warm, as installing them when cold can lead to oil canning on very hot days. (Oil canning is when a flat sheet of steel gets ripples in it.) A 10 foot long piece of steel trim will change in length by 0.120” in a 150 degree F. temperature swing. Although this is small, it does exist and should be taken into account.

4. Fascia trims are designed to abut each other, not overlap. Behind each joint, place a bead of caulking (color matched caulking is available), so as to insure a weather tight joint.

5. Install fascia trims to a stringline across the bottom edge, any ups and downs between the top of the fascia board and the roof steel will be hidden by the shadow of the roofing. Fasteners should be placed within a few inches of each end of the piece of trim and approximately every three feet along the length. If fastening upwards into the bottom of the fascia board, drive fasteners only in far enough to align the trim with the stringline. Any screws installed through the wide face of the fascia trim should be in a straight line and close to the top edge of the trim. Do not over-tighten screws. They are best left slightly on the loose side to prevent puckers.

With a little patience, fascia trims can not only be straight and stay straight, but most important of all – look straight on hot or cold days!