Tag Archives: deflection criteria

North to Alaska

While Alaska is America’s last great frontier, it doesn’t mean when we go North, we throw proper structural design out of a window.

Reader CRAIG in WILLOW has more challenges going on than he has dreamed. He writes:

“Hello,

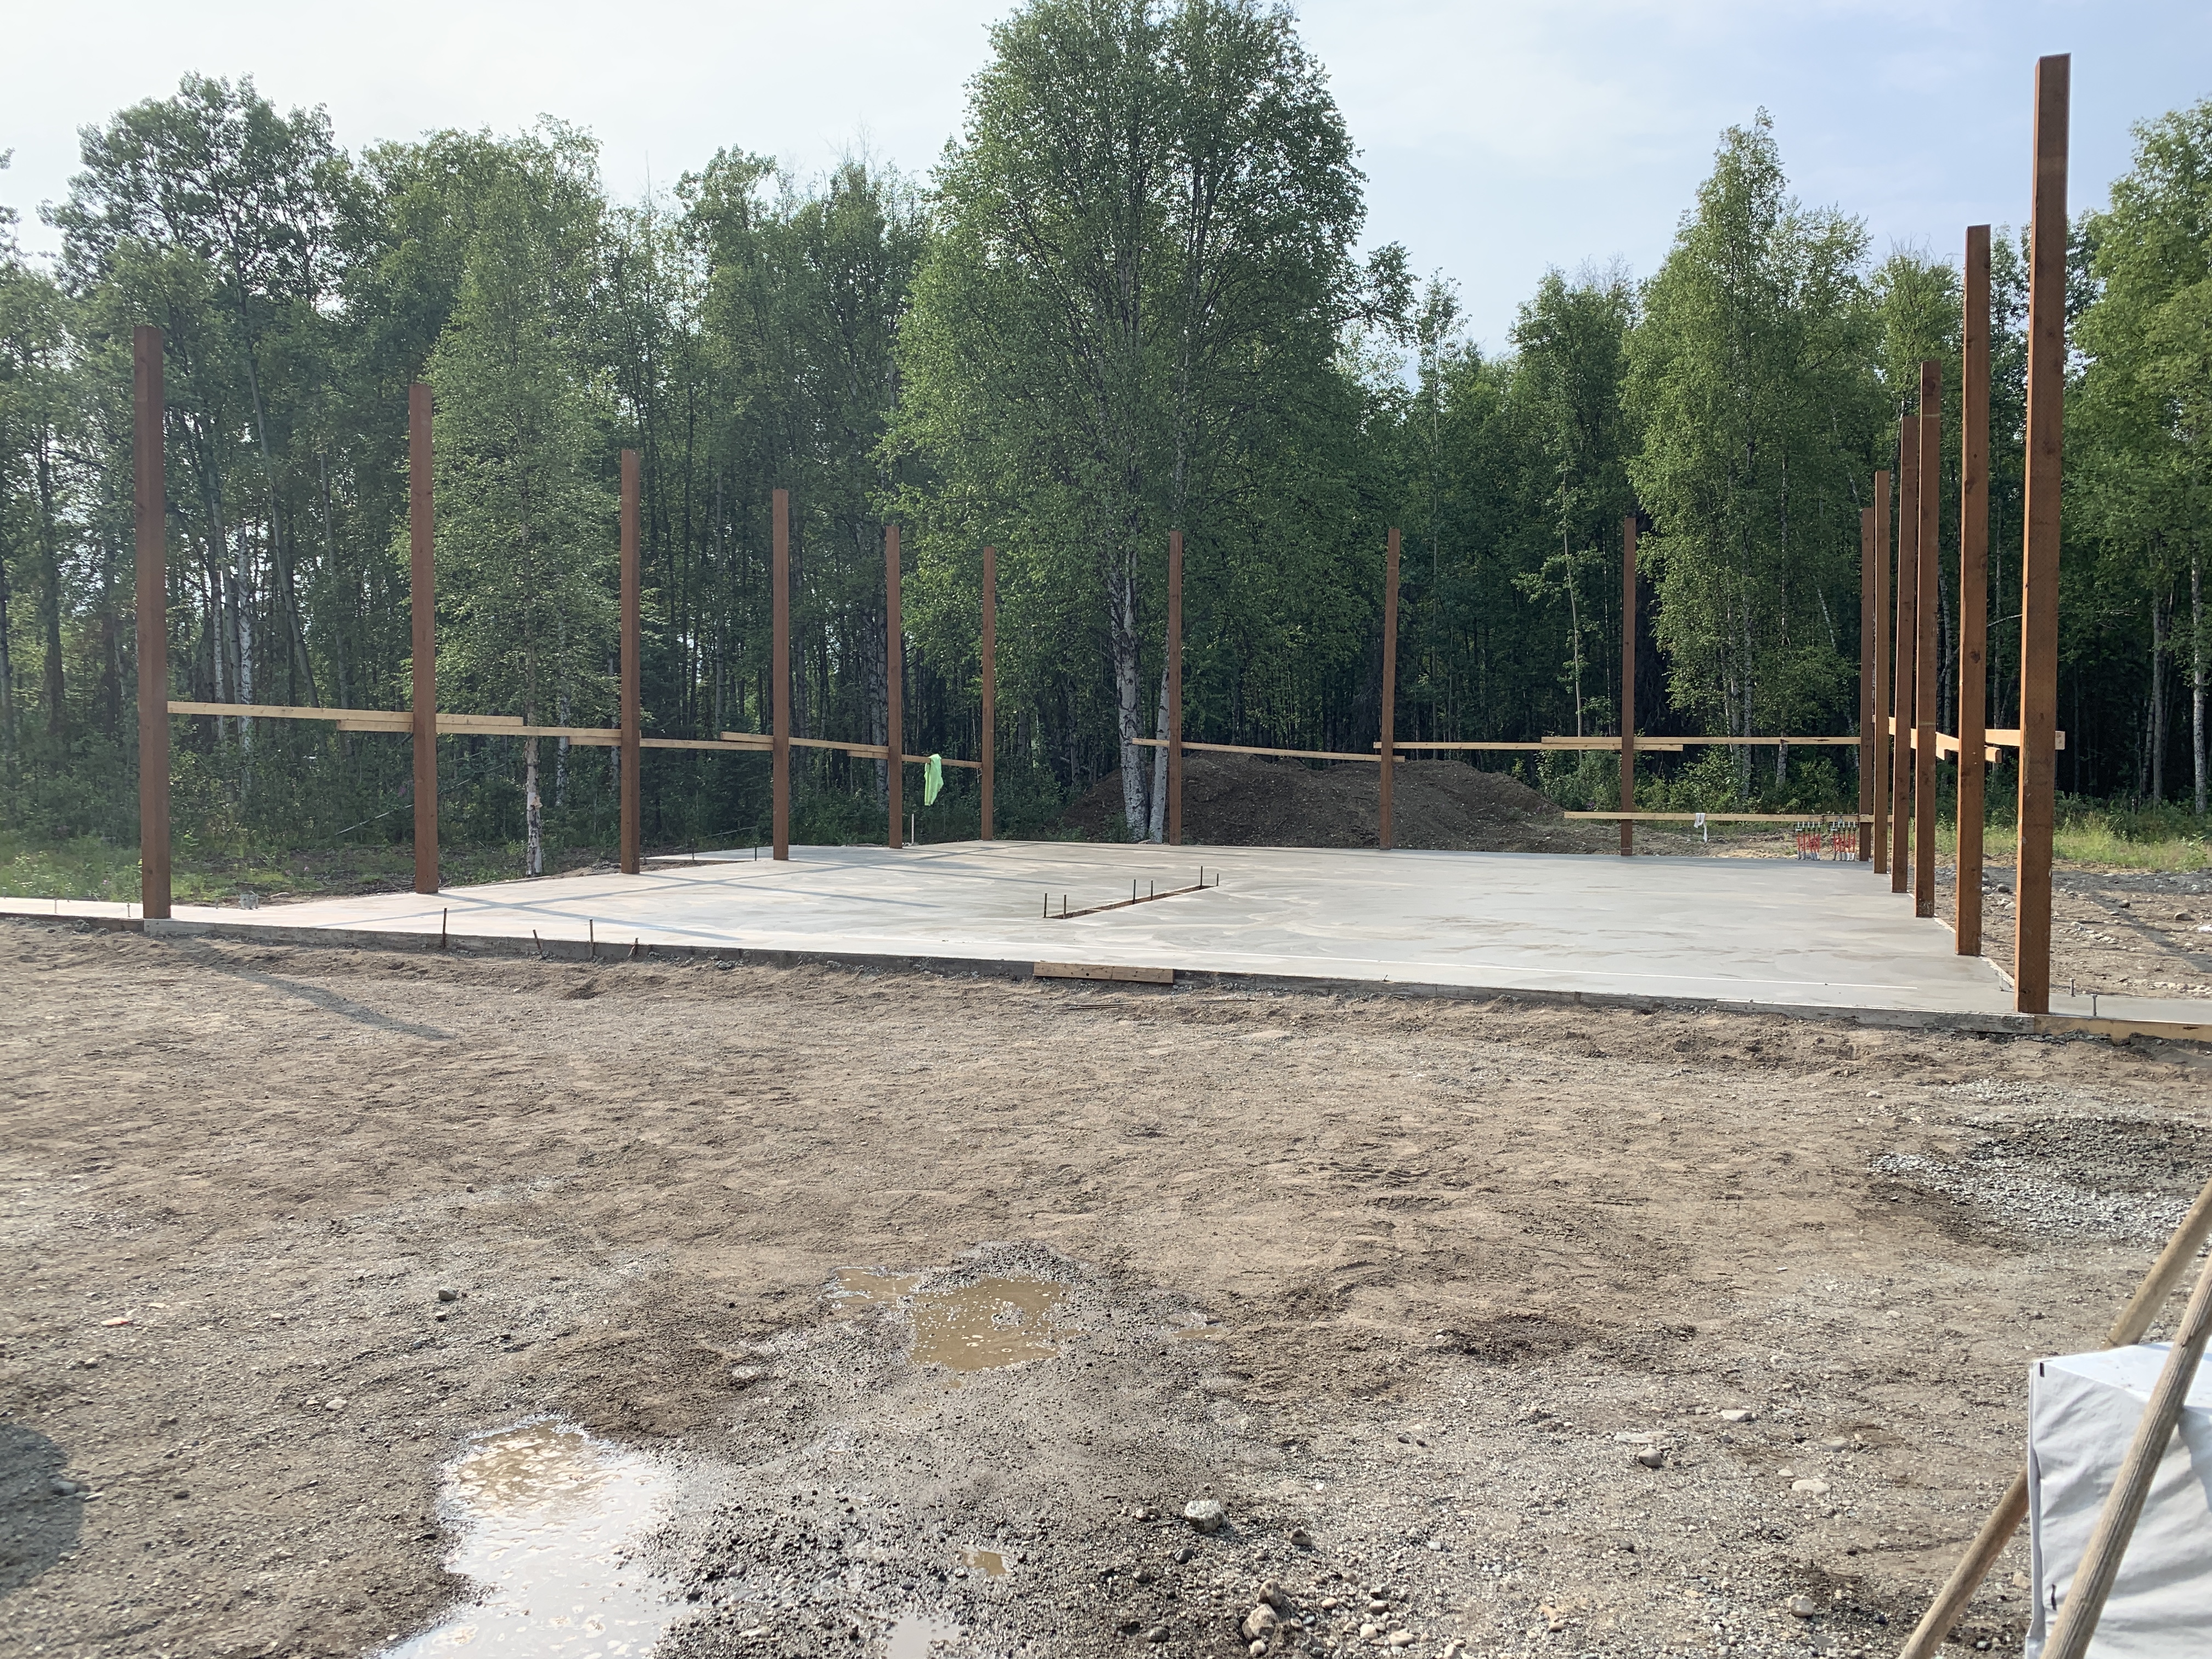
I’m building a 42Wx50D pole barn. I have 6×6 columns spaced 10’ apart on more than adequate footings. Slab on grade 5-6inches thick (poor final grading ) with 6” mesh and pens tubing. Willow has a snow load of 90:10:10. With a 4:12 pitch, truss companies up here are recommending a set of two two-ply trusses for a total of 24 trusses. 2’ overhang.
My problem is figuring out how to support the load between the trusses. They won’t give me a recommendation. I was planning on using 2×6 between top chords spaced every 2’. These would be oriented vertically and installed with joist hangers. I don’t think they’d be strong enough. The top chords on the trusses are called out at 2×6 so it’d be difficult to hang a larger member on them.

If I can’t make this plan work should I frame in between the columns and build a stick frame wall to set normal trusses on every 2 feet? What about laying some size beam across the tops of the columns and then setting trusses at 2’ centers? I’m dead in the water and want if anything to have overbuilt. Can you help? Thanks.”

Here is my response:

You have a plethora of challenges going on. This is why I always, always, always (did I mention always?) tell clients to ONLY build post frame (pole barn) buildings from engineer sealed plans produced specifically for their building at their site. It is not too late to get one involved and it will be money well spent.

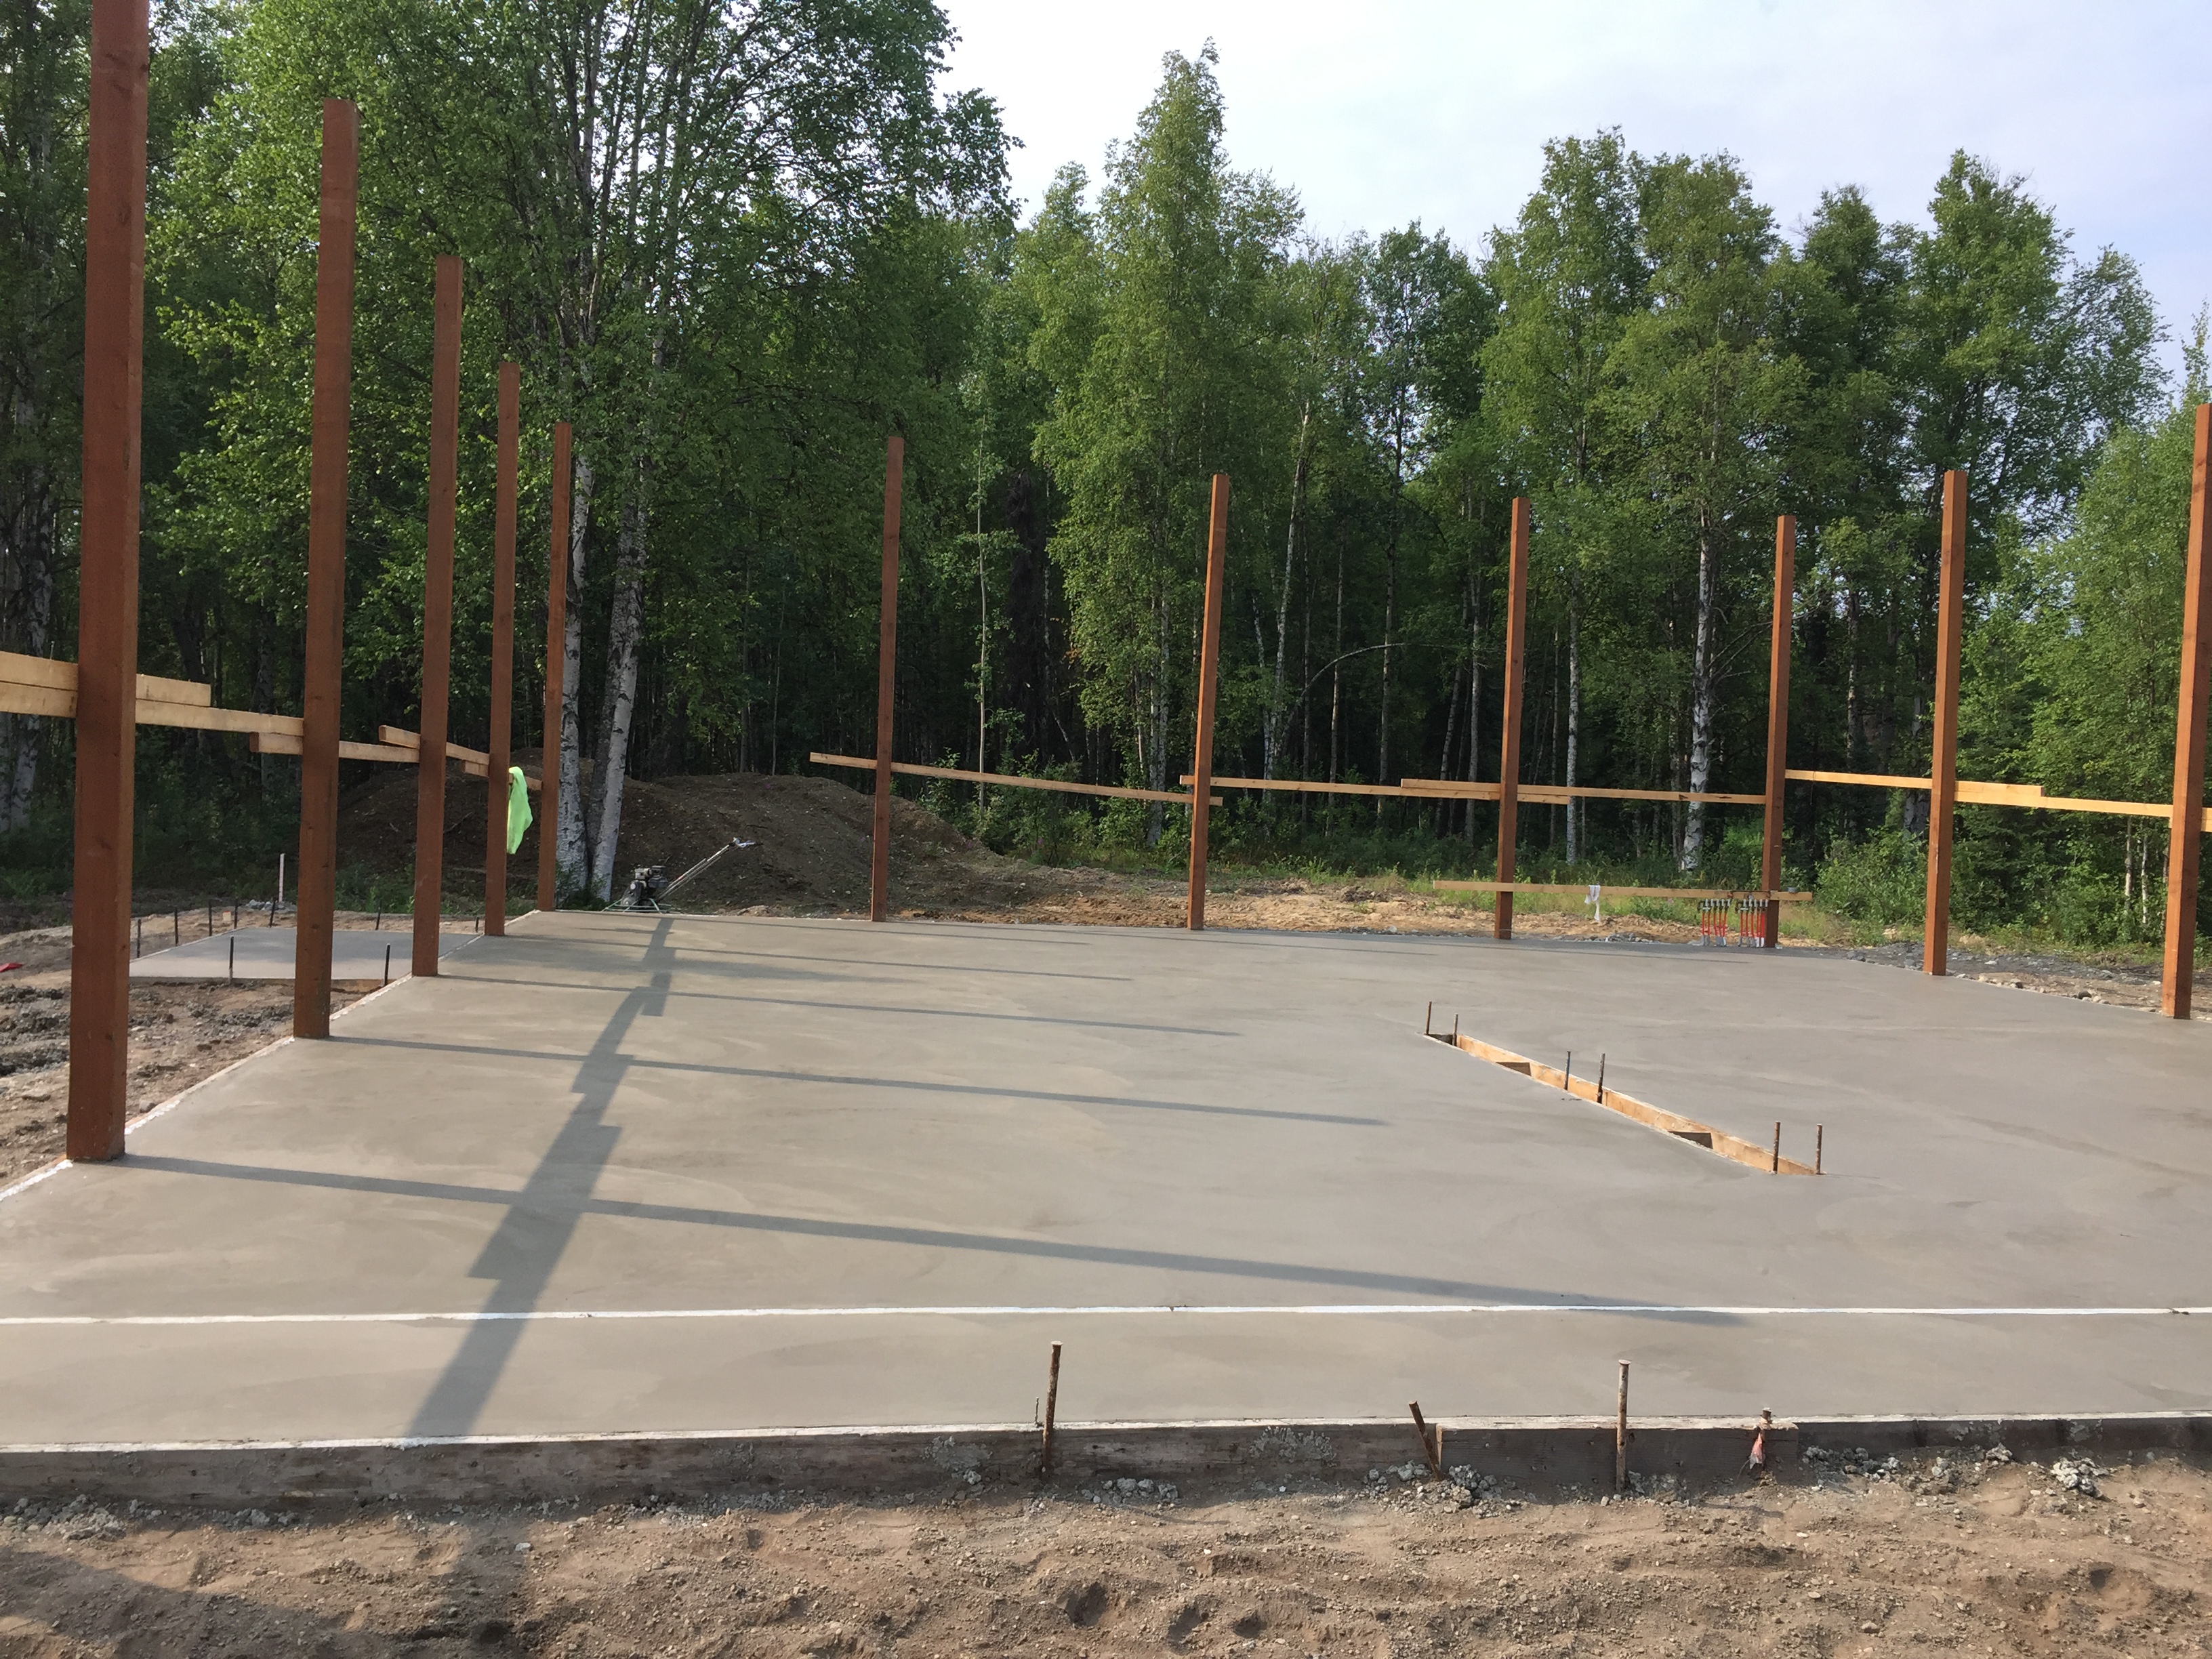
Challenge #1 It is highly doubtful 6×6 columns you have placed along your building sidewall are going to be adequate to carry combined wind and snow loads. An engineer can design a repair – probably involving adding 2x lumber to one or both columns sides.

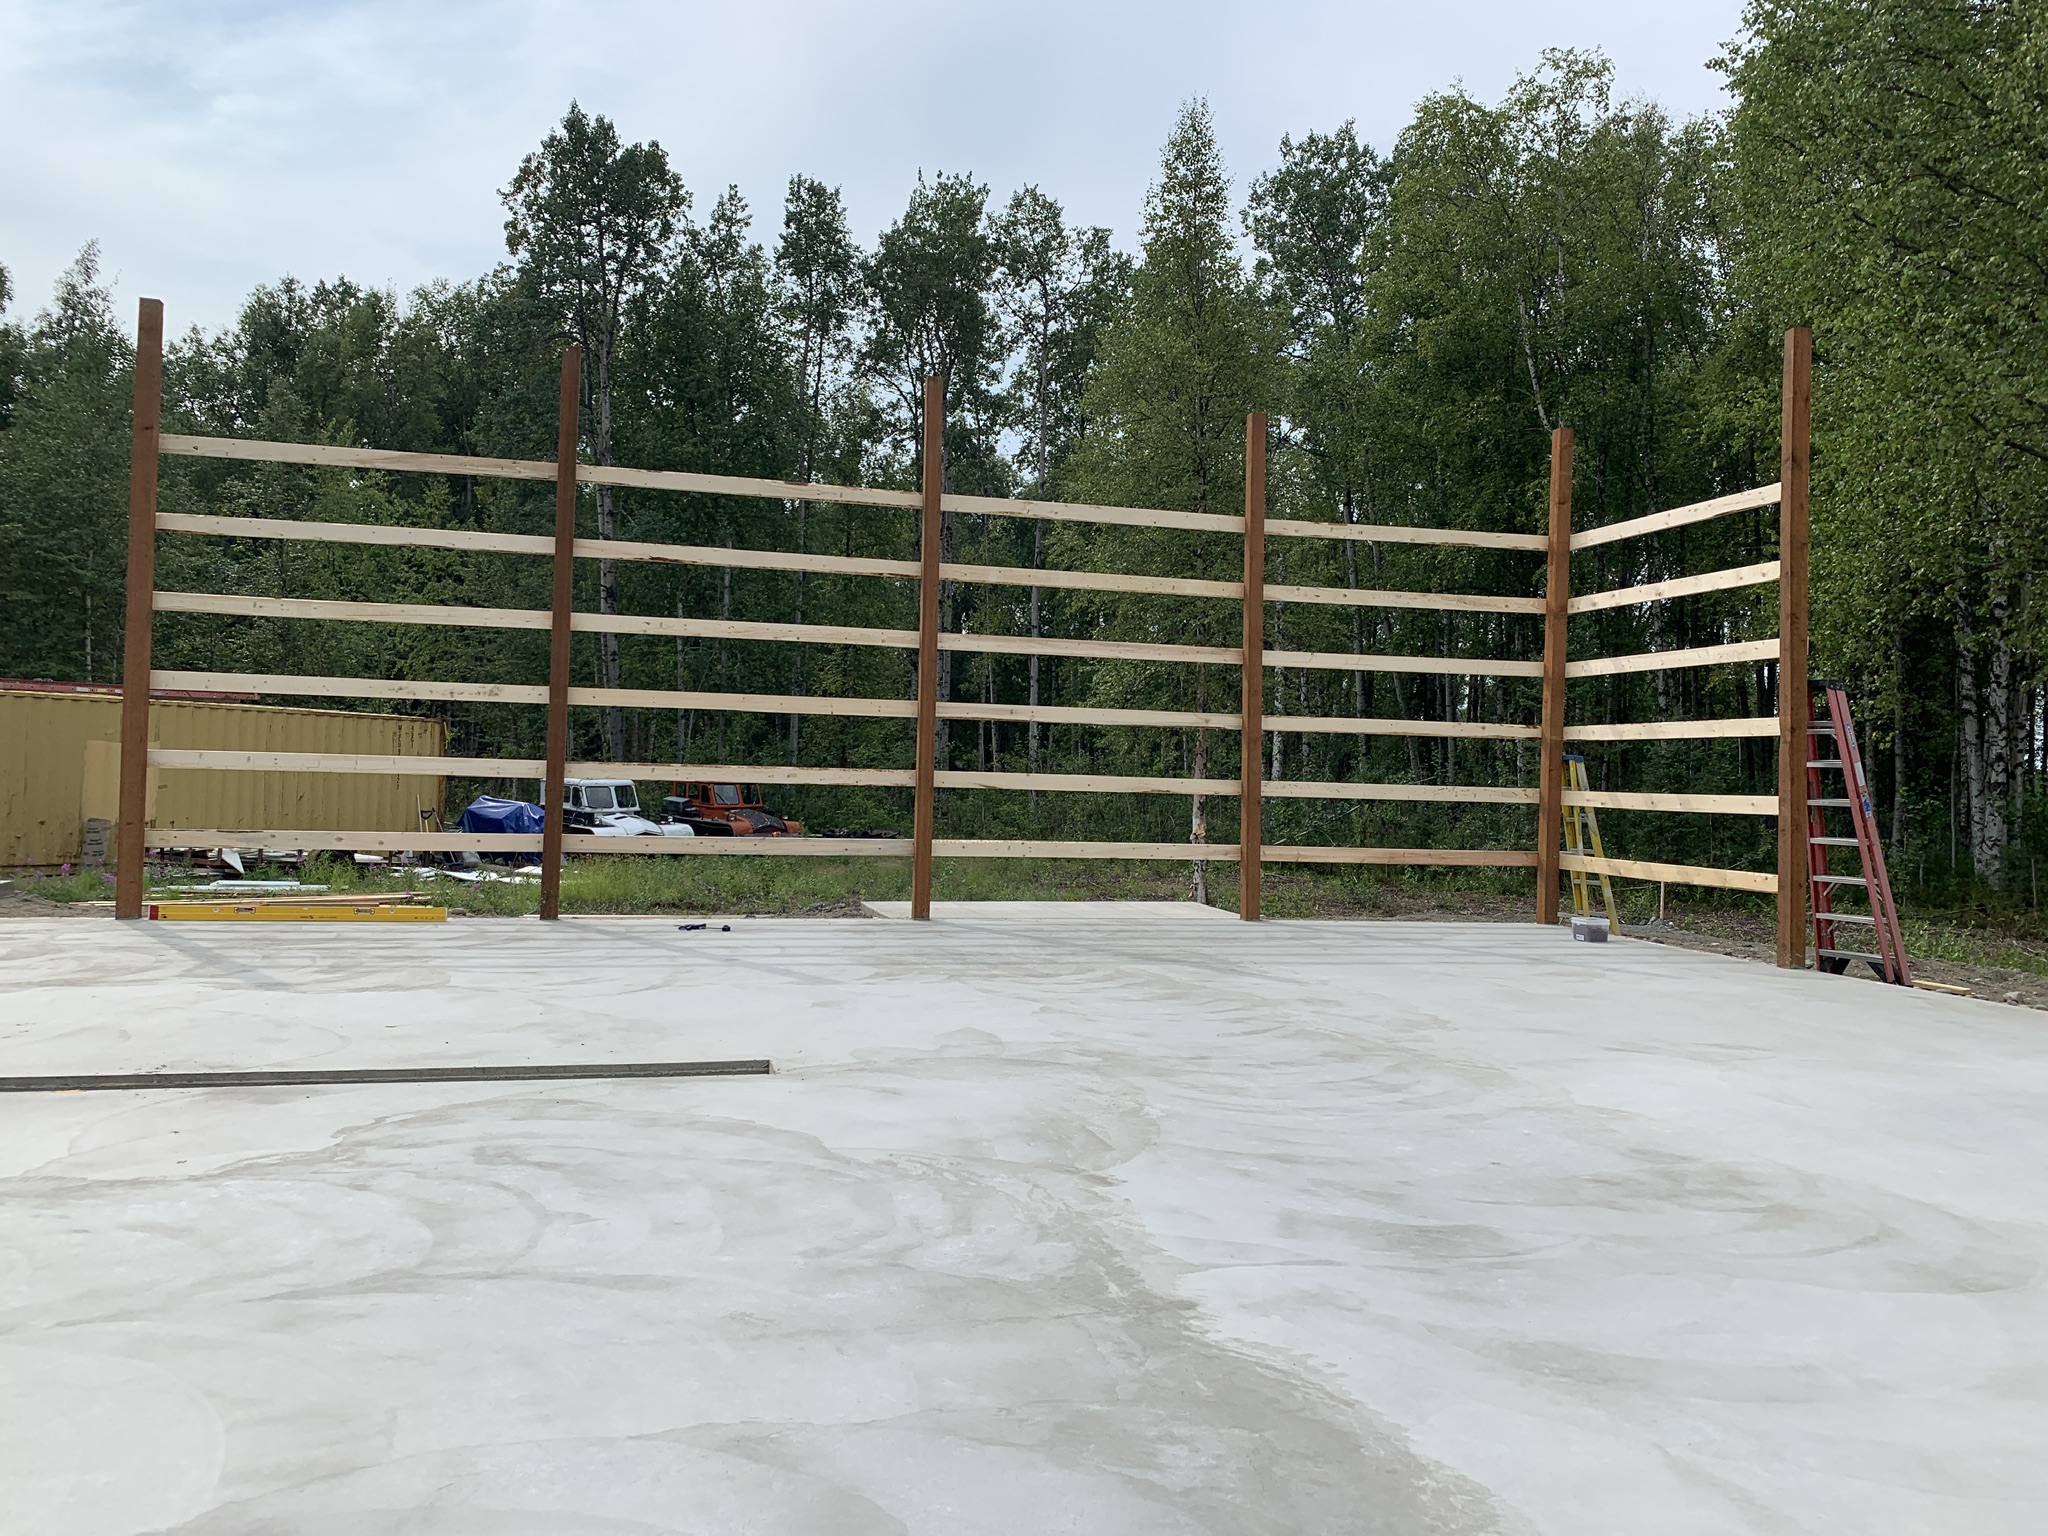
Challenge #2 Your wall girts placed on column faces “barn style” will not meet Code requirements – they will probably fail in bending and absolutely will not be adequate for deflection. https://www.hansenpolebuildings.com/2012/03/girts/
Again – an engineer can design a repair and there are several choices. You could remove them and turn them flat like book shelves between columns – you would need to add material for blocking at girt ends. https://www.hansenpolebuildings.com/2018/09/making-framing-work-with-bookshelf-girts/ Or, more girts could be added to your wall. Or, a strongback (2×4 or 2×6) could be added to your barnstyle girts to form an “L” or a “T”. My personal preference would be a bookshelf design, as it creates an insulation cavity.

Now – on to your trusses and roof purlins.

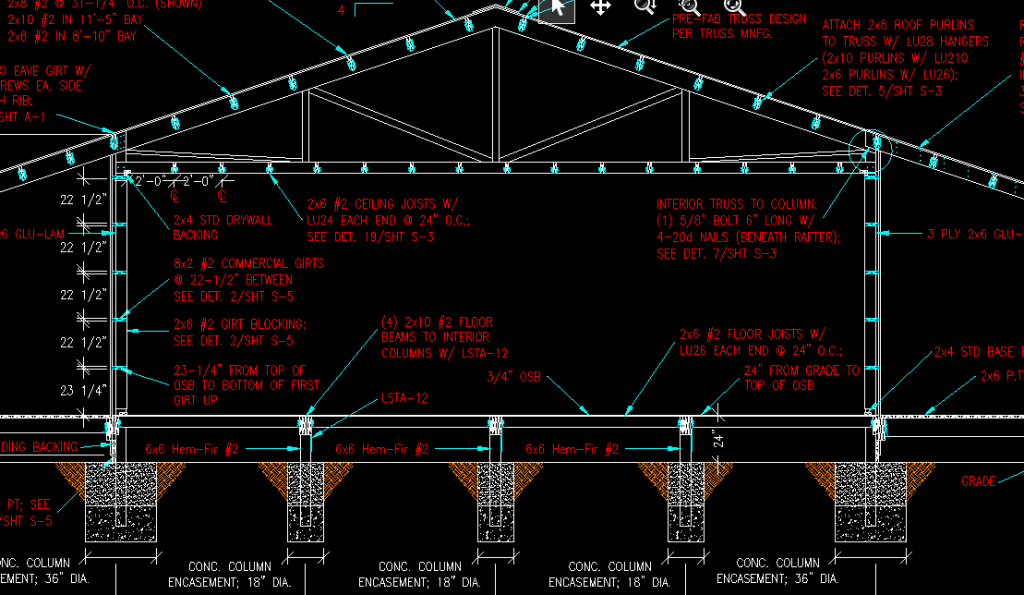
Your snow load is actually 90 psf (pounds per square foot). 10 and 10 are dead loads – you may not need ones these large. If you are using light gauge steel roofing over purlins top chord dead load can be as low as 3.3. Steel over sheathing 5. Shingled roof 7. If using steel roofing, make sure it is capable of supporting this snow load over a two foot span. If using sheathing, 7/16″ OSB or 15/32″ CDX plywood will not span two feet with a 90 psf snow load. Second 10 is bottom chord dead load. It is adequate to support the weight of ceiling joists, two layers of 5/8″ Type X drywall and blown in insulation. For a single layer of sheetrock and minimal lighting five psf is probably adequate. No ceiling – 1 psf. Important – make sure truss people are using 1.00 for DOL (Duration of Load) for snow. With your snow load, chances are snow is going to sit upon your building’s roof for a significant time period. Again, an engineer can determine what loading is adequate for your situation.

Trusses – how about placing three of them every ten feet? They can be notched into your columns from one side so you have full bearing – when two trusses are placed each side of a column, they are not acting together to load share.

Your roof purlin dimension can be larger than truss top chords – just utilize larger purlin hangers and balance of purlin can hang below top chord of truss. An engineer can confirm adequacy of hanger nails to support imposed snow and wind loads. Given your load conditions, your engineer should be looking to use something like 2×8 #2 purlins every 12 inches or 2×10 #2 purlins every 19.2 inches. You would not want to go to 2×10 unless truss top chords are at least 2×8.

You could stick frame between columns to support trusses every two feet. Any stud walls over 10′ tall do need to be designed by a Registered Design Professional (architect or engineer) as they would be outside of Building Code parameters. Your slab edges would also need to be thickened in order to support added weight. A beam could be placed from column to column to support trusses, you are probably looking at something around a 3-1/2″ x 14″ 2800f LVL.

If you are considering insulating an attic space, be sure to order raised heel trusses. They are usually no more expensive and they afford full insulation depth from wall-to-wall. https://www.hansenpolebuildings.com/2012/07/raised-heel-trusses/

With all of this said – go hire yourself a competent Registered Professional Engineer today to resolve your challenges. Otherwise you are placing yourself and your building contents at peril.

Thoughts on a Floor

Thoughts on a Floor:  

Brought to you by reader ANDREW in LEBANON:

“Hi! I am looking at purchasing a post frame building to use as a new home. We are well on our way with being under contract for the land and one of your recommended builders is meeting me at the site this week to make sure the land is good/flat enough.

I will be hiring the construction of the exterior and then build the interior myself.

With that said, here is my question (I will do my best to describe it by typing.) Instead of pouring a huge concrete slab (building will be 60×96), I want to do a typical crawl space to be easier to run plumbing and such, plus make changes as needed. Also, concrete slabs are expensive, especially for 5,000+ sqft. What are your thoughts? I will run 2×10 side by side (doubled up) the entire 96′ length supported every 12′ by concrete footers and building columns. This will be roughly 24″ from the ground (haven’t fully decided on the height yet). Along with that, going to 60′ width, I will use 2×8, 16″ OC. I forgot to mention, along the inside perimeter of the posts, I will be running 2x10s attached to the posts. The ends will have the 2×10 laying on top (along with concrete/building posts every 12′), and the joist ends resting on the eave sides.

With all that said (hopefully legible and not rambling), what do you think? I think it is a pretty solid plan and will not only save a lot of money by not doing a slab, I will effectively have a crawlspace. Yes, I know this will raise the entry points so the door looks like it will be off the ground 3+ feet, but I will be putting a decent sized deck on the front as well as a smaller one on the rear point of egress. A quick reply would be greatly appreciated so I can hopefully discuss more with the builder as well as for my own personal planning purposes. Thanks a lot!”

DEAR ANDREW:  I am a fan of living on wood instead of concrete, so crawl space makes total sense to me.

The right way to do this is to have your floor incorporated into the original engineered plans for your building. This will assure you of several things – the footings will be designed with an adequate diameter to resist settling (last thing you want is to have a post or posts sink. It also will make sure the size of the members will be adequate to support the loads both from a weight bearing standpoint as well as deflection. Your doubled 2×10 idea for supporting the floor joists is hugely under designed and it is very possible it would create a failure condition, not something you want to have occur in your new home.

Floor deflection is an under discussed realm (you can read more here: https://www.hansenpolebuildings.com/2015/12/wood-floors-deflection-and-vibration/). 2×8 #2 at 16 inches on center and 2×10 #2 at 24 inches on center are going to have virtually the same spanning abilities as floor joists, however the 2×10 floor will meet L/480 requirements for deflection, while the 2×8 joists just barely meet the code minimum of L/360. The added plus – the 2×10 joisted floor takes 16% less board feet of lumber and is less expensive to build!

Turn a Horse Barn into a Home?

Re-purposing buildings is a popular American past time, as evidenced by the proliferation of big box lumber stores across the country. Here is a story about a new owner of an existing Hansen Pole Buildings’ horse barn, who is contemplating it becoming a home.

Tim writes:

“Hello, I just purchased a property that has a Hansen Pole barn that is new on it and I am wanting to convert to home any ideas and /or plans , I have attached a photo of barn  center section is 48×28 x14 and the 2 side sections are 48x12x10”.

Drum roll please:

You emailed me because you know and trust I am the expert and will not lead you astray. Or, this was the email address you happened to find, either one of which is totally fine.

In order to give you definitive answers I would need to know who the original purchaser of the building was, so we can pull up the plans and specifications for it, if they are available.

In the meantime, I will hope to give you my best guess answers. The existing building is most probably designed under Risk Category I of the International Building Code (being as it is used as a horse barn) which is for buildings of low risk to injure someone in the event of a catastrophic event. These would be non-residential structures. A residence is a Risk Category II structure – which has more stringent requirements for wind, snow and seismic events.

The real issues are most likely to come in designing to gypsum wallboard (sheetrock aka drywall) the walls and ceiling.

On the walls, the deflection criteria for walls which support drywall is much greater than a wall with only steel on the exterior. This can affect the size(s) of the columns and they may have to be added onto in order to provide adequate stiffness. It is likely you will use bookshelf girts on the walls to create an insulation cavity. If so, and they are properly sized, they should be stiff enough to support drywall.

The trusses, rafters and roof purlins are not designed to support the weight of a ceiling. This will require an engineered truss repair, as well as probably upgrades to the rafters on each side (addition of more members). If you are planning on attaching sheetrock to the underside of the roof purlins, more purlins will need to be added to reduce deflection – and the only real way to insulate between the purlins on the sheds is to use closed cell spray foam, which is not an inexpensive proposition.

Ventilation is going to pose an issue (which is why the closed cell insulation is the solve for the sheds). In the main portion of the building, if a dead attic space is created, it must be ventilated. I cannot determine from your photo if the building has enclosed overhangs or not. If they are enclosed and the ridge is vented, you are in luck. If not, then gable vents are the alternative and would need to be added.

My best recommendation – leave the barn and design a post frame home which truly fits your needs and lifestyle, rather than trying to fit what you want inside a preexisting box which requires a boatload of work to upgrade.

Fastest Pole Building Ever Constructed

The Pole Barn Guru - Americas Fastest Pole Barn BuilderProbably the highlight of my career as a pole barn builder came October 30, 1996. On live television, in the 30 minutes prior to Bob Villa, Momb Steel Buildings set a world speed record, as we constructed a fully featured, two car garage, in a client’s limited access back yard. This was a Sunday morning, and everyone went all out. The City of Millwood blocked off a 20 square block area for parking and equipment. Spokane County arranged for a Building Inspector to work on Sunday. The television people even erected bleachers in our client’s backyard. We printed up a gross of long sleeve T Shirts with “World’s Fastest Pole Builder” on them, and they were so popular I didn’t even get one! One of the most fun parts of the whole experience was pumping concrete OVER the house (I am sure to the shock of our clients).

Prior to the event, the building crews which helped us were positive we could not construct it in under an hour. After the event, we took all of those who participated out for lunch. Instead of eating the free food, they all were drawing on napkins with carpenter pencils figuring out how “next time” we could shave off 5 seconds here, and ten seconds there… by doing things differently!

For a short time in 2000, I was a manufacturer’s representative for a company which manufactures glu-laminated columns for the post frame industry. Great product, but seriously lacked in distribution, and soon found myself back in the pole building business working for another contractor. During this time, I became intrigued with products being offered over the internet and felt this would be a prime place for pole building kits.

In 2000 I made probably the smartest and happiest decision of my life, I married my “bride” of now eleven years.  With her background and mine, I quickly envisioned a business structure so “out there”, even my bride thought I was nuts.  I wanted to sell pole buildings completely off the internet.  No bricks and mortar sales office, no lumberyard, truss plant or even in-house sales staff.  Just she and I, and maybe a few others to handle some of the paperwork.  After talking about it for two years, my idea became an exciting reality.  In 2002, Hansen Pole Buildings was born.  It quickly became a huge success, and today, we remain predominantly an internet based business, heavy on automation, technology and cutting edge business savvy.

In my now over 30 years in the industry, I’ve had buildings delivered and built in all 50 states, over 14,000 of them. Recent innovations have been many. With CCA pressure preservative treating being pretty much eliminated due to a settlement between the EPA and the CCA chemical producers, some alternative preservative chemical formulas were found to react with steel, when water was present. To combat the negative effects of this reaction, we’ve added a protective barrier between the pressure treated skirt boards and the steel base trim. This also has necessitated the use of stainless steel screws to attach steel to pressure treated lumber.

For clients concerned about the chemicals being used in treating, plastic sleeves are available to isolate the treated wood from the surround soils. Steel brackets have been developed to allow pole buildings to be constructed on top of concrete piers, foundation walls and slabs.

We’ve replaced paint on screws with powder coating, offering a finish which will outlive the steel panels (https://lelandindustries.com/productpdfs/page%2048.pdf). The screws themselves are now coated with superior finishes to resist corrosion.

The advent of the International Building Codes in 2000, caused significant changes to the way code conforming buildings are designed. Deflection criteria has made girts (horizontal wall framing) attached wide face to the wall columns not meet the more stringent deflection criteria. In response to this, we’ve designed most of our buildings with wall girts installed flat (like book shelves) to resist deflecting.

We are constantly upgrading and innovating our design solutions. As better products are developed, we look for ways to make construction faster, easier to install and more reliable in performance.  More than ever, we look for ways to produce eye pleasing buildings which are not hard on the budget.

I look forward to sharing the journey with you.

Mike Momb ~ The Pole Barn Guru