Tag Archives: blow in insulation

Converting an Unfinished Wood Frame Steel Building

Converting an Unfinished Wood Frame Steel Building

Reader GEOFF in WILLISTON writes:
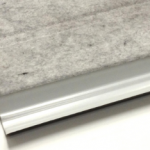
Mike, I think I came across a response on the internet of yours to a question about installing liner panels on the bottom chord of trusses and blowing insulation over the top. If memory serves me the question included the position of the vapor barrier on the liner side of the insulation.  You had also recommended 2″ of spray foam on the underside of the roof panels to control condensation. My customer is converting an unfinished wood framed metal building into an equipment wash bay. I’m recommending spray foam on walls with liner panels over and liner panels affixed to the bottom cord of the trusses above. Do you think a vapor barrier on the bottom chords before liner panels, then blown insulation and spray foam on the underside of roof panels, and some power venting of the “attic” space should be about as effective as can reasonably be expected? (Trusses at 6′ O.C. with some supported added between.) “

I tend to agree with building scientist and founding principal of Building Science Corporation Joe Lstiburek.

Joe stated, “Plastic vapor barriers should only be installed in vented attics in climates with more than 8,000 heating degree days.”

Read more on degree days here: https://www.hansenpolebuildings.com/2022/11/what-is-degree-day/

What is Degree Day? – Hansen Buildings

According to Joe Lstiburek, “Plastic vapor barriers should only be installed in vented attics in climates with more than 8,000 heating degree days.”

www.hansenpolebuildings.com

In our climate, I would only install a ceiling vapor barrier above steel liner panels if I was intending to use blown cellulose for attic insulation. This is due to chemicals added to cellulose to prevent combustion tend to degrade steel if moisture is present. I would much rather see blown in granulated rockwool (my first choice) or fiberglass.

Attic ventilation is going to be critical here and is best resolved with adequate eave and ridge vents, rather than trying to be reliant upon an exhaust fan or fans.

Fun With a Cheap Steel Truss Pole Building

Most of our country is unfamiliar with low budget steel truss pole barns produced and sold primarily in Southeastern states. There is a reason these are prevalent where there is no snow – just in case you were wondering.

Disclaimer, I have no issues at all with prefabricated light gauge steel trusses, provided they have been manufactured to engineer sealed drawings, specific to loading conditions where they will be put into use. AND if they are fabricated by a certified welder (rarely occurs).

Reader KEVIN in COLUMBIA writes:

“Hi Guru,


I recently purchased a home and the property included a 32×84 Pole barn. The barn was never dried in and was barely completed by the previous owner. However, everything is solid, square and plum; with the exception of a few pieces of steel on the roof that were never installed, it is a solid structure. Immediately after purchasing the home I had a monolithic slab poured under half of the structure that will become the foundation for the home of my new shop. I am quite comfortable with carpentry, but not so much with insulation. How do I go about condensation proofing the roof? I really do not want to pull the existing roof panels off to lay a vapor barrier over the purlins. My intention is to have a well ventilated attic, insulate the walls, and blow in insulation over the ceiling. I have heard of some people installing foam board to the exposed steel. Spray foam is an option, but one that is out of my price range for the moment. I have attached some images for your inspection. The 3D CAD models should provide a better illustration of what is under the roof. I look forward to your response.”


Kevin is now experiencing joys associated with buildings sold ‘on the cheap’ – with barely enough materials to get a roof on with a minimal budget. It would have been so simple for this building to have been originally sold and erected with provisions to control roof condensation. Either a Reflective Radiant Barrier (RRB) or an Integral Condensation Control (ICC) would have easily avoided your current situation.

This style of building does not lend itself well to installation of a ceiling (there are no clips along truss bottom chords to accept ceiling joists). My educated guess is these trusses are not designed to support weight of a ceiling. With 2×6 purlins spanning 12 feet, they are sadly not stiff enough to keep drywall joints from cracking – so you are going to be faced with lots of limitations.

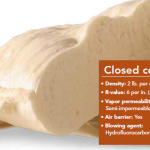
Foam board might be a solution, however you would need to have each panel 100% air sealed between purlins in order to do so. Chances of success range close to zero. You are left with two choices – remove roof steel, install a RRB and reinstall roofing or two inches of closed cell spray foam (roughly $5700). Hopefully you have poured your slab on grade over a well-sealed vapor barrier, if not – use a sealant on top of it (not as effective, but better than nothing).


More Post Frame Ultimateness!

I am not even certain “ultimateness” is a word, if not, it should be!

In yesterday’s article I left you with a cliff hanger. Today I will talk you down. We disclosed one solve yesterday, today’s is even bigger.

“Can my building’s trusses support a ceiling?”

This lament gets answered over-and-over in my every Monday, “Ask the Pole Barn Guru” column. Traditionally pole barns were farm buildings. Rarely did anyone ever finish an interior, or live in one. Due to this, pole barn trusses are most often designed to support minimal weight from bottom chords. Sometimes this design loading is as little as ½ psf (pounds per square foot), but more often one psf.

Now one psf happens to be wonderful for things like minimal wiring and lighting. What happens when one wants to install a ceiling? Whoops.

Part of “The Ultimate Post Frame Building Experience™” includes us doing our best to assist clients in avoiding scenarios they will regret forever. An inability to support an initially unplanned-for ceiling would be way high on this list.

Most commonly ceilings are 5/8-inch thick gypsum wallboard (sheetrock). This is my ceiling material of choice, both for low investment outlay, as well as Type X providing some degree of fire resistance. Drywall is not light, roughly 2.3 psf. It also has to be supported by something other than widely spaced trusses. Ceiling joists (most often 2×6 every two feet) will add nearly a pound per square foot. Blown in insulation is relatively lightweight, even R-60 will add only 1.13 psf.

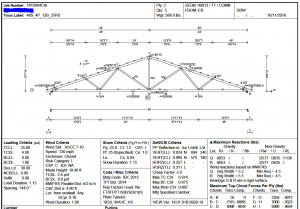
Hansen Pole Buildings has taken it upon ourselves to use a minimum of FIVE (5) psf for roof truss bottom chord design load on all spans up to and including 40 feet. This decision results in a capacity of 500 to 1000% more than most other post frame building kit providers, as well as post frame contractors!

Want to enjoy “The Ultimate Post Frame Building Experience™” yourself? Dial 1(866)200-9657 and speak with a Hansen Pole Buildings’ Designer today!

P.S. This has nothing to do with post frame buildings. For those who are counting (I know of at least one), this is blog article #1666 (oh, no three sixes)! Our youngest daughter happened to have attended a Jesuit high school, and she was so pleased when she got her first cell phone while there and her number’s last four digits were……6666! So Allison, this blog is dedicated to you!

Fiberglass Insulation is Boring

Fiberglass insulation is difficult to write about. In my opinion just about everyone knows about this topic or how the product works. There just isn’t much sizzle to the topic. I would hate to work for an advertising agency or public relations firm having to write about this stuff on a weekly or monthly basis! What can you say about fiberglass to excite potential pole building owners or contractors?

I actually started researching fiberglass insulation when questioned by a Building Official as to the amount of weight it would add to a roof system. Fiberglass is a very lightweight material. In this particular case, to obtain an R-factor of 49, it would take 20-1/2 inches of blown in fiberglass. Installed with the proper density, this thickness adds a weight of only .922 pounds per square foot. This means every inch of fiberglass insulation is adding only .045 pounds of weight!

This kind of weight will not overload average ceiling materials. The biggest concern – proper installation of ceiling drywall. Often drywall hangers do not install enough screws in ceilings (note – screws, not nails). A minimum of five screws need to be used across a four foot wide panel. This means one at each edge and then spaced every foot across the panel. It is essential to not tear through the drywall paper, so do not count any screws which do.

I wondered if flow-through ventilation for attics actually sucked air and heat from attic fiberglass insulation (all attic spaces require ventilation, by Building Code). According to the experts, batt insulation does not suffer from convective heat loss. Blown-in fiberglass, however, can suffer minimal heat loss in very cold regions. This loss only begins to happen when attic temperatures drop below freezing.

How about the R-factors of batts vs. blown-in fiberglass insulation? It didn’t surprise me to find out batts are better insulators. The primary reason for this is the tight tolerances found in the manufacturing process. Batts are uniform. The placement and quantity of the glass fibers can be controlled. This is not the case with blown-in fiberglass. The density of the material is controlled by the installer and settings in the machinery used to blow in the fiberglass.

What happens if the roof leaks? Fiberglass attic insulation is not ruined by water. It will retain its R-value once it dries. However, moisture may cause mildew and mold problems, so it is essential to speed the drying process. You may need to set up fans or heat the area, just like drying out carpet.

Wall insulation (and drywall), which is saturated from flood waters must be removed and properly disposed of. Flood waters potentially contain massive amounts of bacteria which will very probably cause a “sick house” if not remediated. Consult with your local health department for proper steps in treating your “sick house”.

While both batt and blow-in fiberglass insulation are made from the same material, they clearly have distinct applications.  Light, relatively easy to install, they perform an important function in your pole building.  Yes, they “fly under the radar” and quite frankly, may be considered “boring” to some of us, but I’d not want to live in minus 40 degree weather without them!

What is BIBS® Insulation?

I’ve personally used and experienced wonderful results with a product referred to by the trade name BIBS®.  You can read more about it on the internet:  www.bibs.com

I know I’m going to sound like a commercial talking about how great this stuff is, but I honestly have no affiliation with the company producing it. I just happen to have used BIBS® insulation in my most recently constructed building, and I love it.

What is it?  Simply, a shredded fiberglass material mixed with a light adhesive.  A fine netting is placed over the inside of the framing and insulation is blown into place.

Besides offering an “R” value of over 4 per inch, I was impressed when standing inside my building with the wind blowing 60 miles an hour outside.  Inside…it was completely quiet.  If I hadn’t been fighting the raging wind outside earlier in the day, I’d have never known the wind was blowing so hard.

And because BIBS® is blown in, there are no gaps. It eliminates voids, thus reducing heat loss.  Due to its density and the way it’s blown in under pressure to fill every space, there is no settling.  I can attest to this as I have some yet unfinished areas in the 3rd story area of my building, and over seven years later, there are still no gaps or evidence of settling!

When my wife and I considered insulation for our big storage building (60×84), with a loft for our new “living space” we checked out all types of insulation.  BIBS® insulation was less expensive than foam, and had some advantages due to the design of our new building.  Five years later, we‘d do it all over again. We are often surprised to wake up mornings finding it has rained and realize we didn’t even hear it, even with a steel roof.

BIBS® was blown into some very irregular spaces in our pole building. It has a gambrel roof style and custom designed windows, which have odd angles and spaces around them.  I know we’d never have filled those voids with any other type of insulation and had such a complete and tight “fit” with any other insulation.  Having the insulation tight around plumbing reduces the possibility of freezing pipes in the wintertime.  We have no drafty outlets…no drafty anything, due to BIBS®.

Probably the only “down” side to this product for you do-it-yourselfers is it is only installed by certified BIBS® installers.  However, to their credit they come in knowing exactly what they are doing, so having experienced installers cuts down on labor costs overall.  I know this is one “do-it-yourself” project I am happy to pass along (this and concrete!) to those “in the know”.  There are just some things you want and need to have done “right” and this is one of them.  After seven years, I am a happy camper with the results of choosing BIBS® for part of our insulation needs.  We have a phenomenally low heating and A/C bill, amazing sound control (quiet!), and maybe just the feeling of being “snug as a bug in a rug” …which is pretty nice considering winter is…coming!