Tag Archives: attic trusses

Spray Foam, Second Floor, and Bending Posts

This week the Pole Barn Guru discusses a reader’s concern about “condensation leaks” when using spray foam, advice on costs of attic trusses vs traditional second floor, and how to stop posts from bending when the wind blows.

DEAR POLE BARN GURU: I am building a 40×50 post frame building as my garage. It will have concrete floors and HVAC. I intend on insulating the entire building (walls & ceiling) with closed cell spray foam. I’ve read a lot about people having condensation leaks, so my question is: Should I wrap the walls (and/or ceiling) with Tyvek or spray foam directly to the metal? Second question is should I use plywood on the roof for better structure and to have something to spray foam to? Any advice is appreciated. Thanks. CHRIS in BLOOMFIELD

DEAR CHRIS: Closed cell spray foam is a great product, however it would not be my first choice for your climate zone. For best results, closed cell spray foam should be two inches or thicker to prevent condensation, and applied directly to the roof and wall steel. Hopefully you have a well-sealed vapor barrier beneath your building’s slab. With closed cell spray foam, you may experience condensation on your building’s interior, so do not be surprised should you have to mechanically dehumidify. Unless specified as necessary on your engineer sealed building plans, you should not add plywood or OSB to your roof system, as it will add unexpected dead loads to your building system.


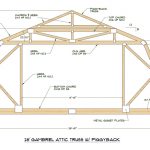
DEAR POLE BARN GURU: Hello. We are wanting to build a 2 story pole barn winery. First floor winery and second would be air-bnb type rental. We aren’t sure if we should use attic truss or complete the build with a traditional second floor. Cost is probably biggest concern. Space second as we know attic truss would be less room. Would you do an attic truss or traditional 2nd floor type build and roughly cost difference between the 2? Building size will be roughly 40×60. Thank you for your time. CRAIG in ROCK CREEK

DEAR CRAIG: If cost is your biggest concern, then having rental on ground floor will be least expensive, easiest to climate control, more accessible for your guests and easiest to fire separate from your winery.

If your only option is to have rental above winery, going with a second floor type build is going to give you far less costly investment per square footage of rentable space.


DEAR POLE BARN GURU: I built a pole barn for my r/v a couple of years ago. I used 4×4 for my posts with a metal roof and purlins with no siding. The posts are set 3′ into the soil with no concrete. Posts are 10′ out of the ground. When we get a strong wind the posts bend slightly at ground level allowing the structure to flex. Is there a way to add strength to the posts or do I need to replace with a larger size post and should I embed the post in concrete or will it rot? MARK in BRADENTON

DEAR MARK: I am frankly amazed your building is standing! This response is not to be taken as a replacement for an actual engineered structural design and should be verified by an engineer prior to moving forward. You should replace 4×4’s with at least 6×6 (it may require 8×8’s depending upon design wind speed and exposure at your site) #2 Southern Pine columns pressure preservative treated to UC-4B (there will be a treating tag on one end of each). Columns should be at least 40″ in ground and backfilled with pre-mix concrete.

Post Frame Homes

Post Frame Homes – Coming Soon to a Neighborhood Near You

After providing or building post frame (pole) buildings for over 40 years, one might think there would be very few things coming as a surprise to me.

Well…..SURPRISE!

Barndominiums and shop houses are no surprise to me at all. I first built one for myself in Northwest Washington State more than 25 years ago (although I suppose we could dial this back to even 1990). This ‘dial back’ was on steeply sloping property where my grandparents had their lake cabin (previously having belonged to my maternal grandfather’s parents since 1937). An aging two-car Model T garage set on cedar posts was showing not only signs of age, but was dimensionally impractical for modern sized vehicles.

My solution then was to tear the old garage down to its elevated floor, build a new post frame building around it, then drop the old floor out. Being as this new, larger footprint (22’ x 24’) garage was on 4 feet of grade change, I was able to construct a 16’ x 22’ studio apartment below it and by using bonus room attic trusses (and a spiral staircase in one corner) was able to have a 10’ x 24’ office space above!

Both of these buildings were on a 60’ x 225’ lot, in the midst of dwellings on both sides. Being as we were located in a forest, it didn’t feel like we had homes right on top of our neighbors.

Now, back to our photo….

When our client approached us about a post frame home on Lake Havasu, I really didn’t envision it being located tight amongst other homes. Most of our barndominium clients enjoy open space where they can avoid bumping elbows with their neighbors. It wasn’t until this particular client forwarded to us progress photos of their build when I had an ah-ha moment!

This client is building in a neighborhood!

Our client is providing their own tile roofing and applying stucco to their building’s exterior. When all is said and done, no one will be wiser to this being a post frame home, unless they happened to watch it being built.

While post frame barndominiums are renowned for their flexibility of design, I can see some astute building contractors realizing foundation cost savings and speed of erection making for a practical solution for most any neighborhood.

Cutting Barn Trusses

Just a Little Nip Here, Tuck There

As so many of us have entered an age of Covid-19 binge television watching, I can imagine there are more than a few who have consumed calories while watching 100 episodes of Nip/Tuck (originally aired on FX from 2003-2010).

While nipping and tucking can solve many human cosmetic issues, it is done by highly skilled professional surgeons. Want to nip and tuck on a building’s structure? You wouldn’t hire a bus driver to perform plastic surgery, so don’t try to be your own structural engineer.

Reader BRIAN in ANDERSON writes:

“I have a barn, 40 foot wide, 36 feet long.  I need to increase the height of the front garage door to fit an RV, and need to modify a single truss in the front of the building to make room for a roll-up garage door (barrel door).  The trusses are engineered attic trusses, and span the 40′ without any support.  The distance between the web members that would make up the “wall” of the attic room, is just over 16′.  The door is 16′ wide.  So I need to get some more room between the web supports, and remove a section of the bottom chord.  I will be raising the middle section of the bottom chord by 26″. My plan is to modify the truss in two ways:  First create a new bottom truss to effectively turn this single truss into a coffer truss, and widen the web members.  The new bottom chord will sandwich the existing truss elements with a new 2×10 on each side, and gaps of the new chord path filled in effectively making a solid beam 3 boards wide (considering construction adhesive between the layers as overkill).  Including some drawing showing the steps I plan to take.  Probably overkill, maybe not enough, just want a reality check on the plan.  Also, trusses are 24″ on center.”

Mike the Pole Barn Guru responds:

Stop.

Never, ever cut a truss without having an engineered repair. Ideally this could be obtained from whomever manufactured your building’s trusses originally. If you are unsure, there should be a manufacturer’s permanent ink stamp on each truss bottom chord. Should you not know who fabricated them, stamps are not able to be found or manufacturer is no longer in business, hire a local Registered Professional Engineer to come examine your trusses and provide a repair drawing (if it is even possible to be done).

For extended reading on not cutting trusses: https://www.hansenpolebuildings.com/2016/07/cutting-trusses/

Top Plate

Top Plate (Truss Carrier) Size With Attic Trusses
Question from reader JEFFREY in STAPLETON:
“I’m building a gambrel pole barn 30ft x 50ft , these are attic trusses with a 16ft room sitting @ 2ft oc, will 10ft pole spacing with double 2×12 top plate be sufficient, any suggestions?”


Mike the Pole Barn responds:
My first suggestion is to invest in a fully engineered post frame building kit package. Again – “fully engineered” being the key phrase – this means the building is designed specifically for you, on your site, with your features (doors, windows, other openings, etc.). Engineered trusses do not make for an engineered building!

Suggestion number two: If you, for some unknown reason, feel a fully engineered post frame building kit package happens to not be for you (usually this happens when clients have the misguided thought they can buy materials at retail prices for less than the building suppliers can at wholesale) at the very least invest in the services of a Registered Design Professional (RDP – architect or engineer) who is capable of performing the proper design calculations to provide plans which will result in a structurally sound building.

As to your particular scenario, provided your building has no overhangs – those two 2×12 (provided they were #2 Douglas Fir – the strongest of the four most common framing lumber species) would only be able to carry somewhere around 25 pounds per square foot of load. This would be barely enough to carry the required roof load plus the weight of the trusses, to say nothing of the attic bonus room you intend to add.

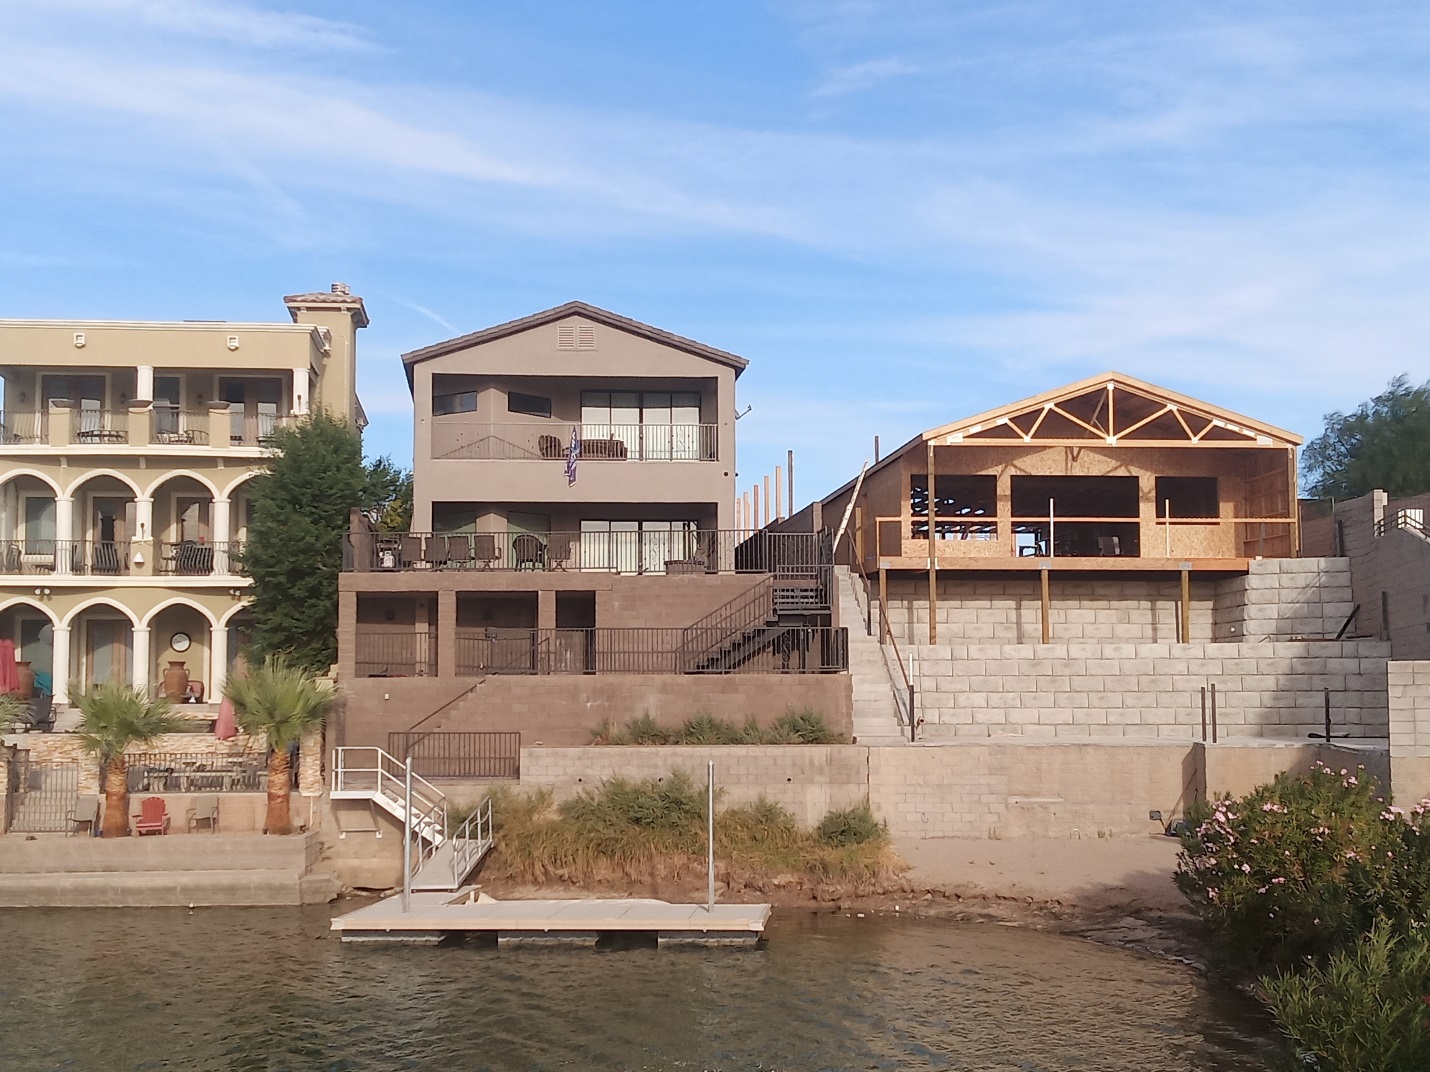
A design solution might be to place a pair of attic trusses directly aligned with the sidewall columns. This would provide direct bearing from the truss to the column and would eliminate the need for truss carriers (aka a top plate). This would be a far more reliable system, as the true double trusses load share and reduce the possible incidence of a weak link in a single truss taking down the entire roof system.

The widely spaced trusses also allow greater freedom in locating stairs for access – trusses every two feet do not provide for an adequate space to get a three foot width stairs between the trusses.

Solutions! The Key to a Successful Post Frame Building

Solutions! The Key to a Successful Post Frame Building

When one considers the tremendous number of individual components and the thousands of people who touch these pieces from concept to jobsite, it is amazing anything ever gets built!
I ran some numbers once – tracked the rough path of all of the parts for a small post frame garage. As best I could tell, in excess of 4,000 people were in some way responsible for getting those pieces successfully to the client.

The true mark of a construction project success is not in everything going perfect.
Success is measured in how the things which did not go perfect got solved.
Here is a real life scenario…..

A client invests in a new post frame building which has “attic” trusses. These would also be described as “bonus room” trusses. The client also ordered a pair of windows for this same building.

As is true in most of life – communication breakdown is what creates most challenges. There is a passing chance the client and his Building Designer discussed where these windows were to be located in his new post frame building. As the great majority of clients know they want windows, however are unsure of exactly where they will be placed on the finished building, we went with them being “field located”. The purchase order and invoice for the building did not specify a window location.
Therein begins the breakdown. Client wanted a window in the center of each end of the bonus room.

Plans are produced and approved by the client, which did not show the windows located in the center of each end of the bonus room. The client, admittedly, was not overly skilled at reviewing plans, and as such did not notice there was no provision on the plans for the windows to be located where he truly wanted them.

Now this particular structure, like most Hansen Pole Buildings, has a prefabricated roof truss on each end of the building. The saving grace – the end trusses are notched into the columns by 1-1/2 inches and flatwise 2x framing is placed on the face of the truss, in the field, to allow for the attachment of the endwall steel.

Here is a solution, utilizing the siding backing to frame in the window:

“The portion of the window inside of the flange is approximately 1-7/8″ thick (the balance of the window thickness is incorporated in the flange and integrated J Channel of the window itself). As the framing on the face of the truss is 1-1/2″ thick, it will entail having to place some 3/8″ thick shims somewhere in the assembly. I would suggest putting them between the members which will surround the window, and any nearby end truss members which support the underlying framing. This will create a gentle curve in the window supporting framing members, which the steel will easily follow and be imperceptible to the eye from the ground.”

The real keys to success – first, make sure everything which is important to you about your new post frame building is spelled out clearly in the ordering documents. Do not leave anything to chance, or chances are it will pose a later challenge.

Second, and most important, invest in a post frame building kit package from people who have actually built post frame buildings and who have been involved in enough projects to be able to come up with solutions to challenges which work!

Limited Storage Trusses

When my now lovely bride (always lovely) first had me visit her home in South Dakota, I couldn’t help but notice her nicely sized 32 foot square stick framed garage. Like most stud framed buildings, it had light weight metal connector plated wood roof trusses manufactured from 2x4s. Like many garages, this one was unheated.

Truss Storage
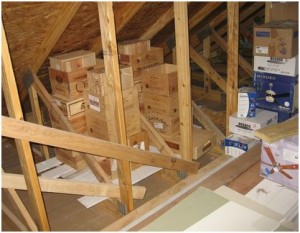
Having spent much of my adult life up until then in the truss industry, I could not help but look up at the trusses and notice things had gone to die between them…..chairs, tables, boxes, basically – stuff!

She was perfectly happy with the way her garage had performed and the roof had previously survived winters of extremely deep snowfall.

Wonderful – except the trusses were not designed to support a load on top of the bottom chords of this magnitude.

Certainly trussed roofs can be designed to support limited storage loads. The 2006 IRC (International Residential Code) Commentary provides the following:

  1. For attics with limited storage and constructed with trusses, this live load only need to be applied to those portions of the bottom chord where there are two or more adjacent trusses with the same web configuration capable of containing a rectangle 42 inches high or greater by 2 feet wide or greater, located within the plane of the truss. The rectangle shall fit between the top of the bottom chord and the bottom of any other truss member, provided that each of the following criteria is met:
  2. The attic area is accessible by a pull-down stairway or framed opening in accordance with Section 807.1; and
  3. The truss shall have a bottom chord pitch less than 2:12.

The storage load provision is for a non-storage (or dead) load value of 10 psf (pounds per square foot) and a storage load of 20 psf. These values can be found in the 2012 IRC Table R301.5 https://publicecodes.cyberregs.com/icod/irc/2012/icod_irc_2012_3_par037.htm?bu2=undefined

With reference specifically to footnotes b and g.

Considering a future desire to hide things in the attic space of your future pole (post frame) building? Then limited storage trusses may be an option well worth exploration!

Universal Forest Products DHP

Universal Forest Products Double Hinge Plate

Having spent a generation in the truss industry, very tall trusses always posed a challenge – both in how to fabricate, as well is in shipping. Granted I once fabricated some 17 foot tall trusses, then couldn’t legally deliver them to the jobsite!

Universal Forest Products https://www.ufpi.com may have solved the problem with the DHP®—Double Hinge Plate system consists of two precisely cut wood members connected by a unique, metal, double-hinge plate. The two wood members are sandwiched around a center block made of LSL (laminated strand lumber) to add extra strength. The center block’s length is trimmed to match the connector plate’s holes and the main members are brought together against the center block.

double hinge plate
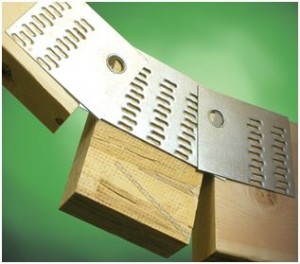
The DHP connector comprises two rectangular, light-gauge, galvanized steel plates. A center plate of similar gauge steel overlaps both outer plates and is hinged to them within this overlap. Punching through the two overlapping plates forms the hinge and creates the truss joint.

Pieces of each plate are pierced from the mother plate on three sides and bent out on the fourth side to form a tooth. Each plate has multiple teeth grouped together, commonly known as a gang nail.

Using a hydraulic press, the gang nails in the outer plates are embedded into both of the main wood members, and the center plate is concurrently embedded into the center wood member. The DHP system is capable of rotating, unlike standard hinges. It’s also structurally capable of transmitting shear, axial, and moment loads between both main members.

Universal’s DHP—Double Hinge Plate can be applied most commonly to what is known as a Cape Cod truss (aka attic truss with a bonus room). DHP is perfect for creating peaks and eaves at the factory instead of the job site. The double hinges can be folded back on themselves, yielding roof trusses which are transportable.

Standard hinges can rotate through on a 110° angle, but DHP can rotate a full 180° and can fold back on itself. The top chord of the roof truss can rotate in the direction of the roof covering, which allows the roof system to lie down flat with its top folded down and its eaves folded in—below the shipping requirements for height and width. When the roof system arrives at the job site, you can simply unfold it and set it up on your structure.

Transportation and setup of your roof trusses have never been simpler. With DHP, more work is done at the factory—and less at the job site!