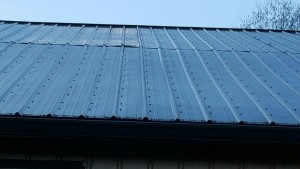
Now me, I look at the photo and think to myself, “This just doesn’t look very good”. Well it isn’t.
 Our re-involvement with this client began recently when he contacted Justine, Hansen Pole Buildings’ Mistress of Materials. Here was her report:
“This client got a building ten years ago and his builders muffed up. Apparently cut too much off on the posts when notching in installation. He says he had someone look at it and they recommended closure strips. Says when it rains it runs down that slope and drain under his roof in that area and is getting his plywood wet under there. Thoughts?”
Justine sent it along to Eric, who did some research and then forwarded it to me:
“So here is an interesting one. Clearly a botch job on installation – job is back from 2006.
To set it up it’s a 40 foot wide building with a 20 wide shed on the side we are looking at and they installed the shed incorrectly. Shed is set to a different slope and now he is getting leaks….probably has been leaking since it was built.
I don’t see any good way to try to seal this with closures. Such a crappy botch – really the best thing is probably longer panels overlapping higher underneath the roof steel but he is looking for a quick fix of course.”
Two years or ten years it was still done wrong. And, as far as I can determine, two wrongs don’t make a right, but three lefts do.
What should have been done, in the beginning, was for the builder to have called us and asked for assistance in solving the problem. We don’t judge, we just look for solutions. In this case, it most likely would have taken pulling out the shed columns and replacing them – not free, but the “fix” they took, involved time and effort, not to mention it did not work.
Here is the least expensive solution today …..
Remove all of the screws where the two roofing panels abutt each other.
Trim three inches off the top edge of the shed roof steel.
Add upper gambrel flashing – placing one leg under the main roof steel edge, the other leg over the shed roof steel. Each piece should overlap the prior one by six or more inches and have a generous bead of clear caulking applied.
Install inside closure strips between flashing and main roof steel, and outside closures between the shed roof steel and the flashing.
The lower edge of the main roof steel and upper edge of the shed roof steel will need to be attached to the nearest roof purlin with 1-1/2” powder coated “diaphragm” screws on each side of the high ribs. The lower edge of the flashing will attach to each high rib of the steel with powder coated #12 stitch screws.
When pole building assembly isn’t going as expected – who ya’ gonna call? I’d try us, before Ghostbusters!


