When I first entered the post frame industry over three decades ago, most pole buildings were barns. Having a climate controlled building (heating and cooling) was rarely a consideration.
Modern pole buildings, serve a plethora of purposes from homes to offices, retail space to churches and everything in between. HVAC (heating, ventilating and air condition) becomes an important consideration.
This blog is nowhere near an in depth guide to climate control, but intended to give the reader a starting point.
The first stop should be to check the recommended R-value calculator:
https://www.ornl.gov/cgi-bin/cgiwrap?user=roofs&script=ZipTable/ins_fact.pl
If starting with a concrete slab on grade, a layer of A2V insulation should be properly installed below the slab.
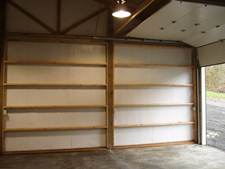
Walls should be framed with bookshelf style girts placed at 24 inches on center. Also referred to as commercial girts, they create an insulation cavity, which allows for fiberglass insulation batts to be installed horizontally  between the wall girts. If steel siding is used, it could be beneficial to use a quality housewrap between the wall girts and the siding. With commercial girts, to properly size the insulation cavity, create a space equal to the depth of the pole, plus the 1-1/2″ outside of the posts where girts extend. This allows for drywall to be attached to the inside face of the wall girts, creating a smooth wall surface.
Another great option for wall insulation is BIBS – which provide a higher R value than batt insulation, as well as filling all of the voids. If you are not familiar with BIBS, check out their website: https://www.bibs.com
As a sidebar, I have BIBS in my large three story (84’ x 60’) accessory climate controlled building (yes, it’s a pole building). The cost savings on our heating and air conditioning bills is testimony in and of itself for this great product.
Ceilings – use ceiling loaded trusses with ceiling joists 24″ o.c. Sheetrock can be attached to the underside of the ceiling joists and insulation can be blown in above.
Any time a dead attic space is created – the attic space MUST be ventilated. As long as 1/2 of the required ventilation area is in the upper 1/2 of the attic, the area of the attic vents must be 1/300th of the footprint area of the attic. Otherwise, 1/150th is required. The best way to get even attic airflow is to use enclosed vented overhangs in combination with a vented ridge.
As I said, this is a primer for how to ensure a climate controlled pole building. Ask whoever is designing your new building for more assistance. I have far more concerns for folks wanting to over-design climate controlling their new pole barn, then “under”. While I want you to be warm (or cool) and comfortable, I also want to be sure you are using the “Three R’s Rule” – selecting the right product, to do the right job, at the right price.


Can you apply 2″ styrofoam I to the girths for moisture control then add a 2×4 wall with r 15 batts. Does this sound over kill?
I have vented roof cap and vents on the gabled ends. Do you recommend a vape barrier on ceiling when finishing and insulating?
No we would not – Sounds like you have adequate ventilation in your attic space. Where we would suggest a vapor barrier is directly below steel roofing if that is what you have installed on the roof but not installed at the ceiling level.